Home » Steps2Take
On this page you will find important information to guide you through the recording proces of the Collegerama Lecture capture service. But first of all: Thank you, for using our service if you planned a recording.
This Item is empty!
This item is used to close the first step of the accordion
Only the title is displayed see custom css in the advanced option!
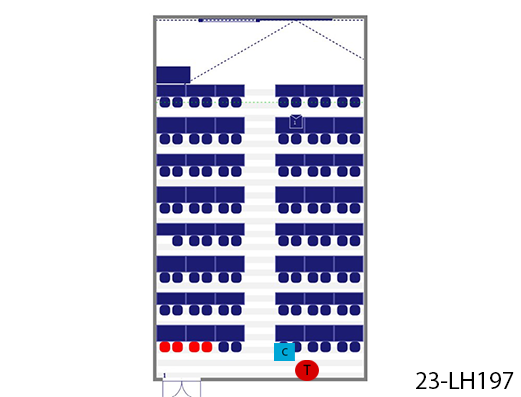
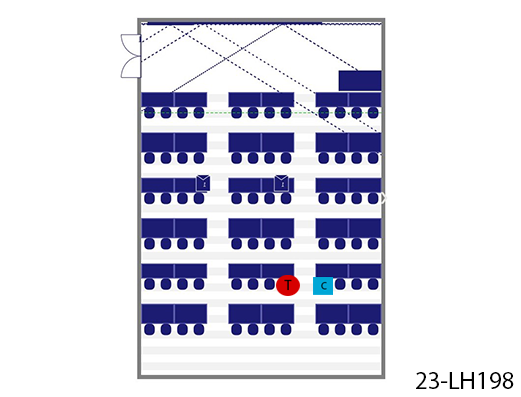
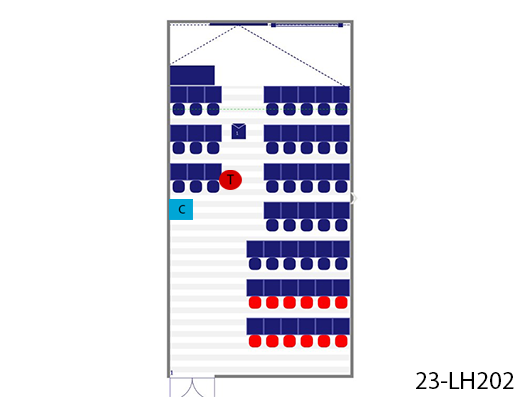
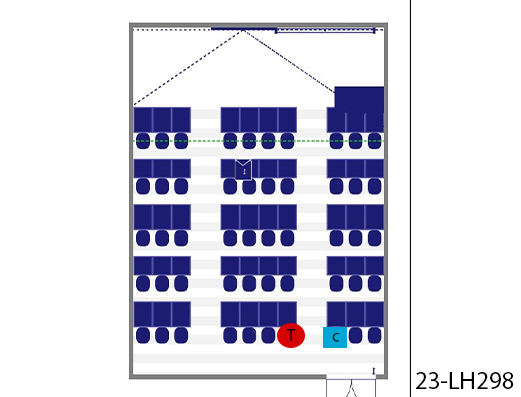
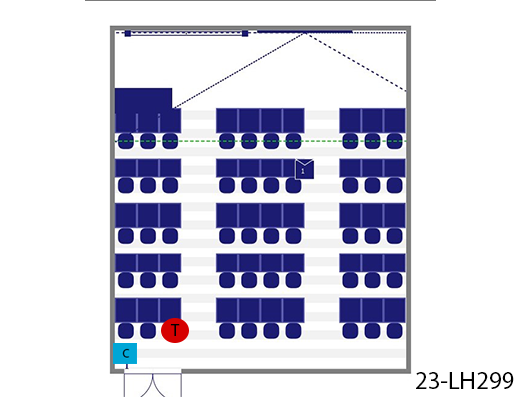
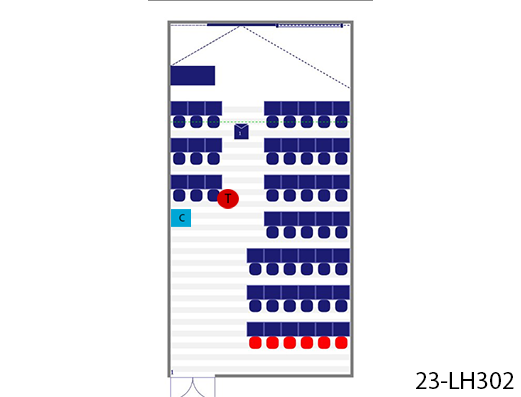
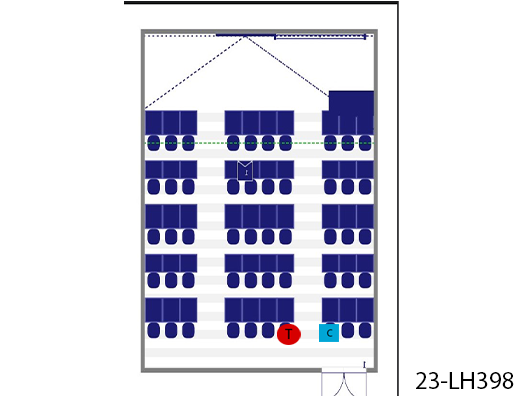
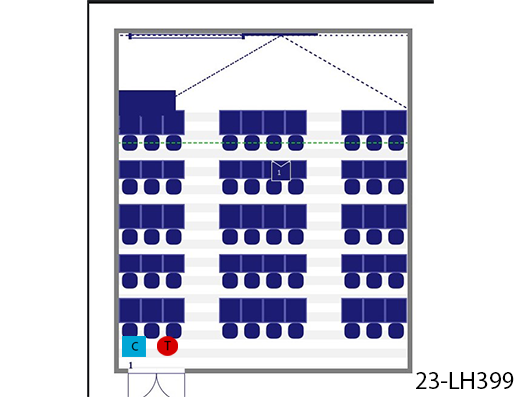
Check what features and facilities are available at the corresponding lecture hall here
For Mobile Recording Service:
If the recording takes place with a mobile unit you will need to connect your laptop to the recording unit through HDMI or USB-C. You will receive a microphone and instructions from the operator.
For Automated recording Service:
Within the Collegerama recording it is not possible to link to other conference or virtual classrooms. Meaning you can not live-link to applications like: Brightspace, MS Teams, Skype, Twitch etc.
Not all Lecture halls and rooms have the same features and facilities. To present an overview of features and functionality the lecture halls.
Last Modifed: 06-07-2025
| . | Image | BuildingNo | Faculty | Building/Hall | Type SA | Storage Equipment | Type recording | Microphone | Camera control | Type PC | Sec. Beamer | Smartboard | Chalk/white board | General info SA | General info Teacher | Location | Esviewer |
|---|---|---|---|---|---|---|---|---|---|---|---|---|---|---|---|---|---|
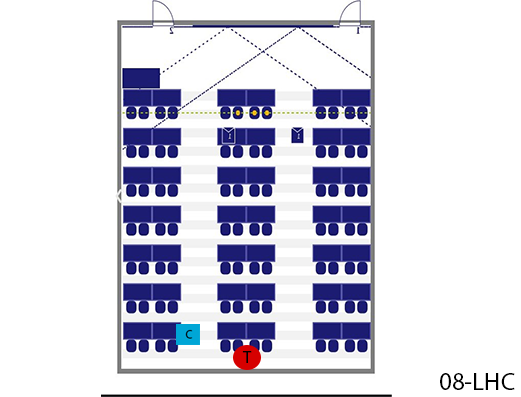 |
8 | ARCH | ARCH Hall C | Mobile | Outside room | In class | Our equipment | Our/Own laptop | Julianalaan 134 |
|
|||||||
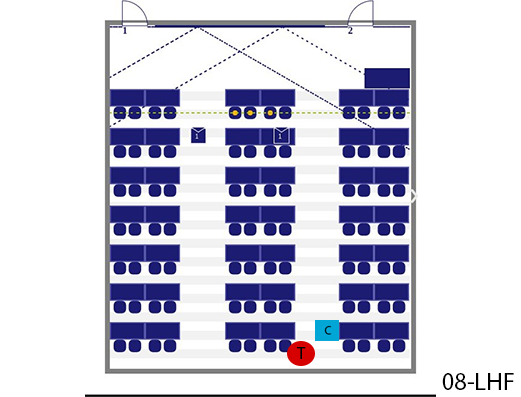 |
8 | ARCH | ARCH Hall F | Mobile | Outside room | In class | Our equipment | Our/Own laptop | Julianalaan 134 |
|
|||||||
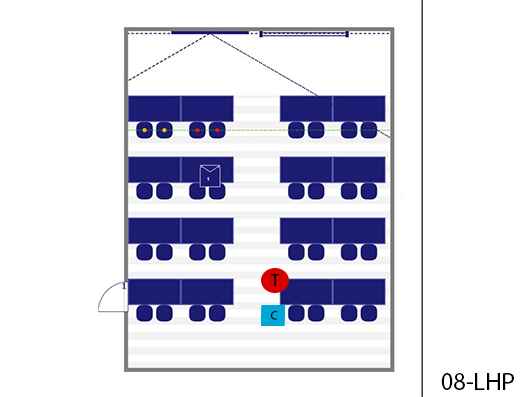 |
8 | ARCH | ARCH Hall P | Mobile | Outside room | In class | Our equipment | Our/Own laptop | Julianalaan 134 |
|
|||||||
 |
8 | ARCH | ARCH Hall Q | Mobile | Outside room | In class | Our equipment | Our/Own laptop | Julianalaan 134 |
|
|||||||
 |
8 | ARCH | ARCH Hall R | Mobile | Outside room | In class | Our equipment | Our/Own laptop | Julianalaan 134 |
|
|||||||
 |
8 | ARCH | ARCH Hall T | Mobile | Outside room | In class | Our equipment | Our/Own laptop | Julianalaan 134 |
|
|||||||
 |
8 | ARCH | ARCH Hall U | Mobile | Outside room | In class | Our equipment | Our/Own laptop | Julianalaan 134 |
|
|||||||
 |
8 | ARCH | ARCH Lecture Hall A | Autotracking | Remote. Autotracking | PickUp SP | Fixed PC / Own Laptop |
Julianalaan 134 |
|
||||||||
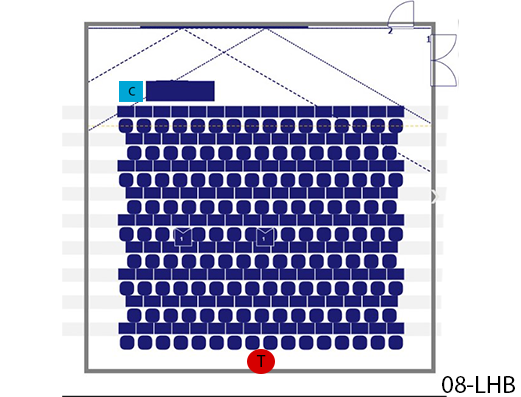 |
8 | ARCH | ARCH Lecture Hall B | * Automated * Mobile (on request) |
Outside room | * Fixed, No control, * Mobile, In class |
* By Fixed; PickUp SP * By Mobile; Our equipment |
Our/Own laptop | Julianalaan 134 |
|
|||||||
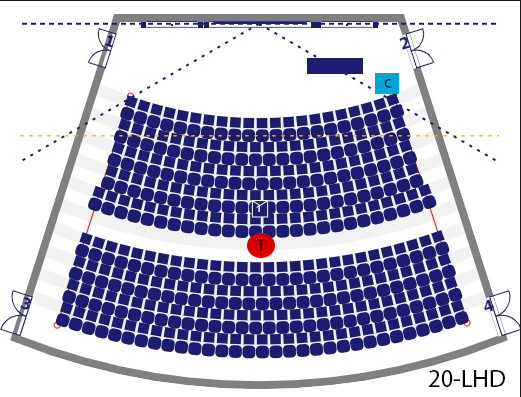
| 20 | Aula | Aula Auditorium | Automated | No control, Automated |
PickUp SP | Fixed PC / Own Laptop |
Mekelweg 5 |
|
|||||||||
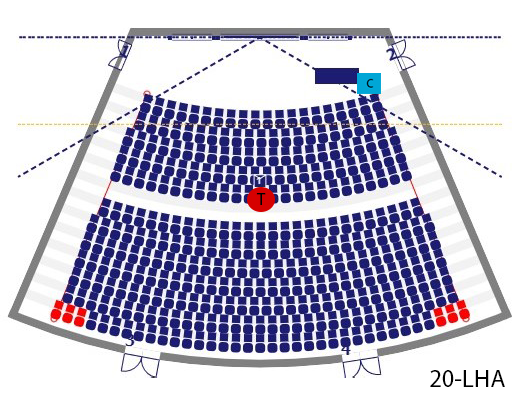 |
20 | Aula | Aula Lecture Hall A | Mobile | intermediate space (back entrance lecture hall) | In class | Our equipment | Our/Own laptop | Mekelweg 5 |
|
|||||||
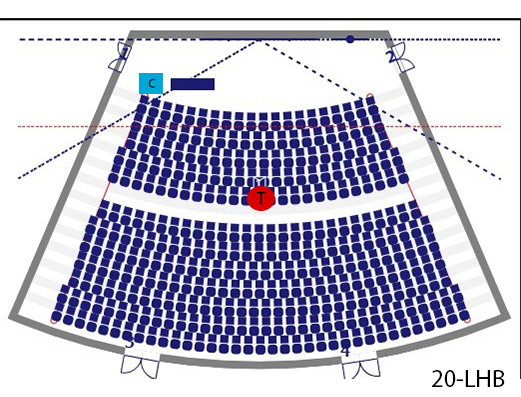 |
20 | Aula | Aula Lecture Hall B | Automated | No control, Automated |
PickUp SP | Fixed PC / Own Laptop |
Mekelweg 5 |
|
||||||||
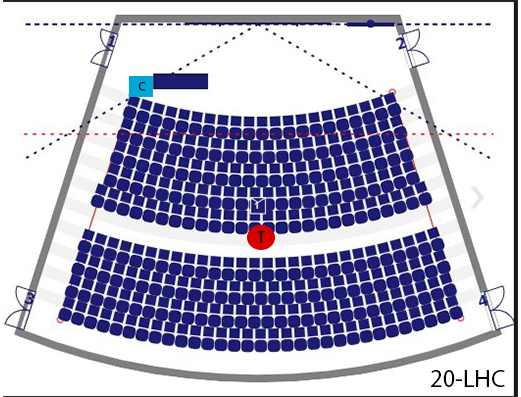 |
20 | Aula | Aula Lecture Hall C | Automated | No control, Automated |
PickUp SP | Fixed PC / Own Laptop |
Mekelweg 5 |
|
||||||||
 |
20 | Aula | Aula Lecture Hall D | Mobile | intermediate space (back entrance lecture hall) | In class | Our equipment | Our/Own laptop | Mekelweg 5 |
|
|||||||
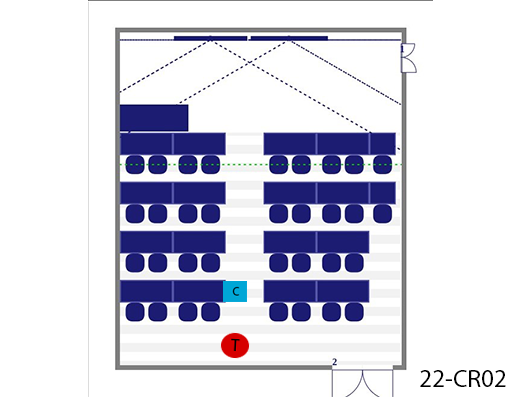 |
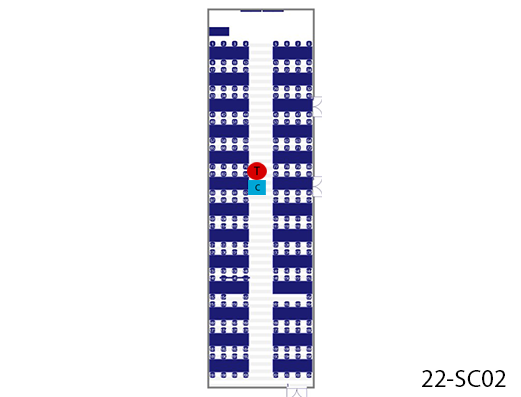
22 | AS | AS (22) Classroom 02 | Mobile | Outside room | In class | Our equipment | Our/Own laptop | Lorentzweg 1 |
|
|||||||
 |
22 | AS | AS (22) Classroom 01 | Mobile | Outside room | In class | Our equipment | Our/Own laptop | Lorentzweg 1 |
|
|||||||
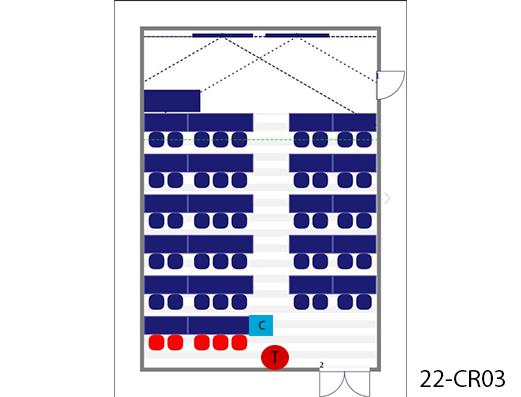 |
22 | AS | AS (22) Classroom 03 | Mobile | Outside room | In class | Our equipment | Our/Own laptop | Lorentzweg 1 |
|
|||||||
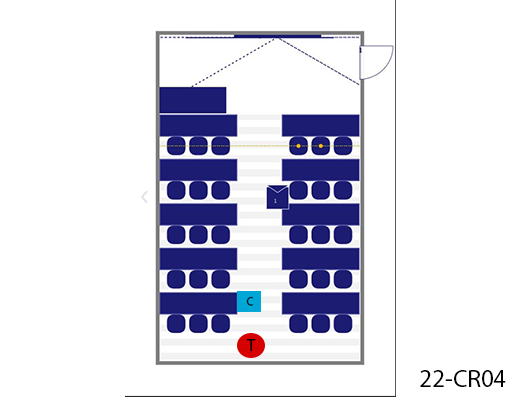 |
22 | AS | AS (22) Classroom 04 | Mobile | Outside room | In class | Our equipment | Our/Own laptop | Lorentzweg 1 |
|
|||||||
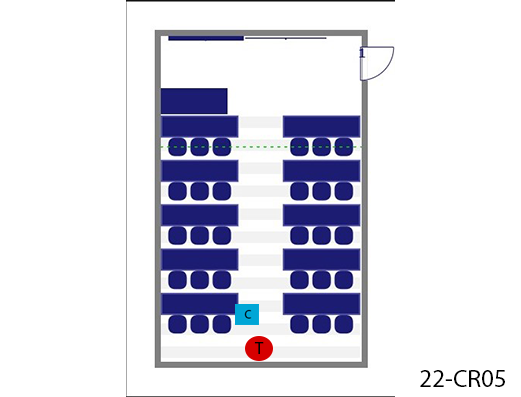 |
22 | AS | AS (22) Classroom 05 | Mobile | Outside room | In class | Our equipment | Our/Own laptop | Lorentzweg 1 |
|
|||||||
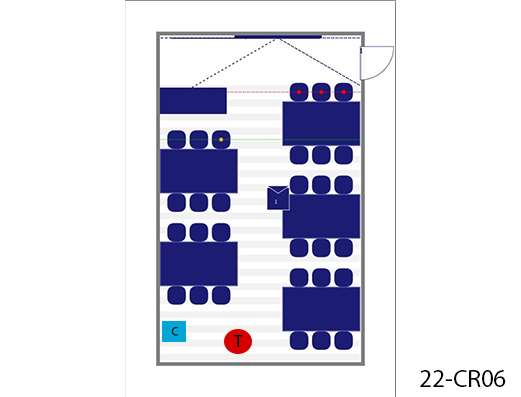 |
22 | AS | AS (22) Classroom 06 | Mobile | Outside room | In class | Our equipment | Our/Own laptop | Lorentzweg 1 |
|
|||||||
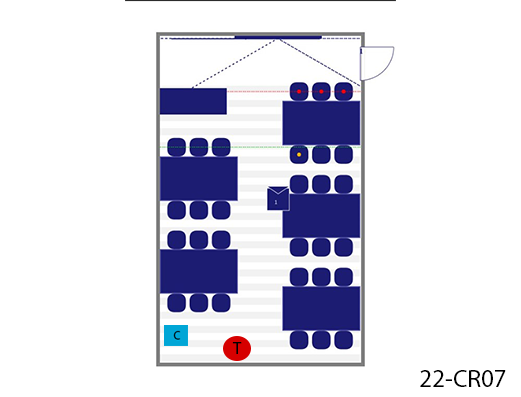 |
22 | AS | AS (22) Classroom 07 | Mobile | Outside room | In class | Our equipment | Our/Own laptop | Lorentzweg 1 |
|
|||||||
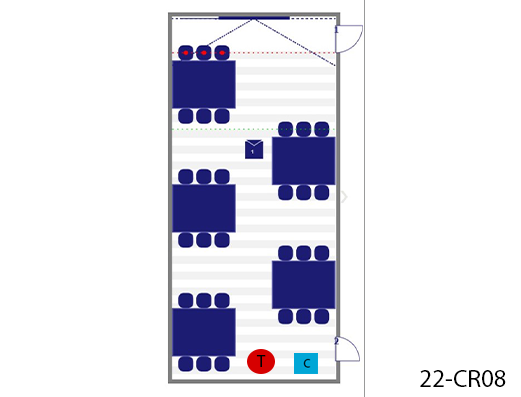 |
22 | AS | AS (22) Classroom 08 | Mobile | Outside room | In class | Our equipment | Our/Own laptop | Lorentzweg 1 |
|
|||||||
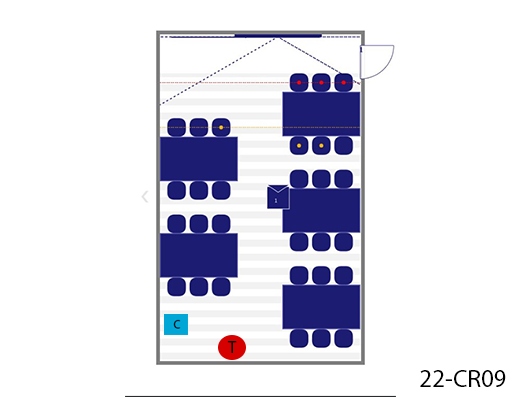 |
22 | AS | AS (22) Classroom 09 | Mobile | Outside room | In class | Our equipment | Our/Own laptop | Lorentzweg 1 |
|
|||||||
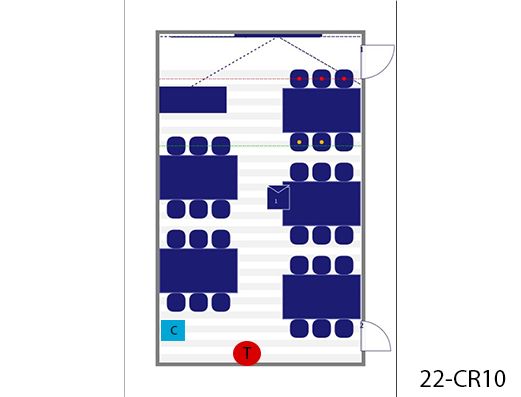 |
22 | AS | AS (22) Classroom 10 | Mobile | Outside room | In class | Our equipment | Our/Own laptop | Lorentzweg 1 |
|
|||||||
 |
22 | AS | AS (22) Classroom 12 | Mobile | Outside room | In class | Our equipment | Our/Own laptop | Lorentzweg 1 |
|
|||||||
| 22 | AS | AS (22) Exam Hall (425) | Unsuitable | Outside room | Unsuitable | Lorentzweg 1 |
|
||||||||||
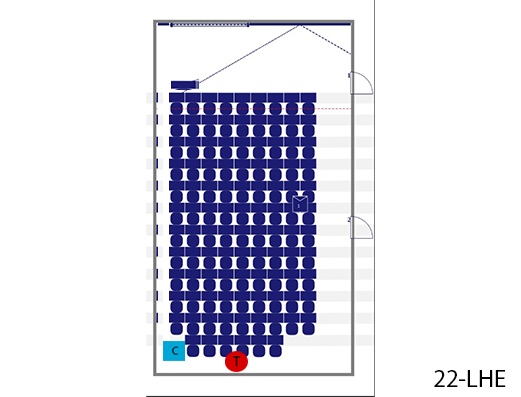 |
22 | AS | AS (22) Lecture Hall E - Mooijzaal (F005) | Mobile | Outside room | In class | Our equipment | Our/Own laptop | Lorentzweg 1 |
|
|||||||
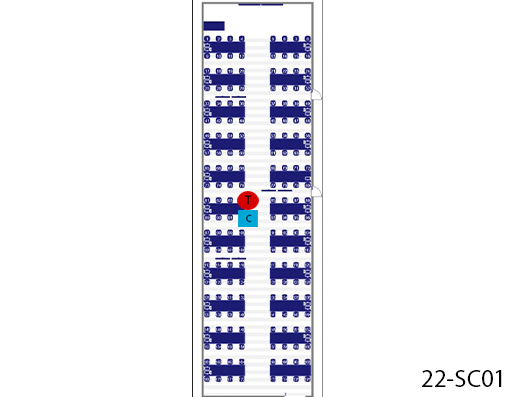 |
22 | AS | AS (22) Studio Classroom 1 | Mobile | Outside room | In class | Our equipment | Our/Own laptop | Lorentzweg 1 |
|
|||||||
 |
22 | AS | AS (22) Studio Classroom 2 | Mobile | Outside room | In class | Our equipment | Our/Own laptop | Lorentzweg 1 |
|
|||||||
| 22 | AS | AS (22) Studio Classroom 3 | Mobile | Outside room | In class | Our equipment | Our/Own laptop | Lorentzweg 1 |
|
||||||||
| 23 | CEG | CEG Computer Room 0.070 | Mobile | Entrance hall CEG-C | In class | Our equipment | Our/Own laptop | Stevinweg 1
|
|
||||||||
| 23 | CEG | CEG Computer Room 0.20 | Mobile | Entrance hall CEG-C | In class | Our equipment | Our/Own laptop | Stevinweg 1
|
|
||||||||
| 23 | CEG | CEG Computer Room 4.98 | Mobile | Entrance hall CEG-C | In class | Our equipment | Our/Own laptop | Stevinweg 1
|
|
||||||||
| 23 | CEG | CEG Computer Room 4.99 | Mobile | Entrance hall CEG-C | In class | Our equipment | Our/Own laptop | Stevinweg 1
|
|
||||||||
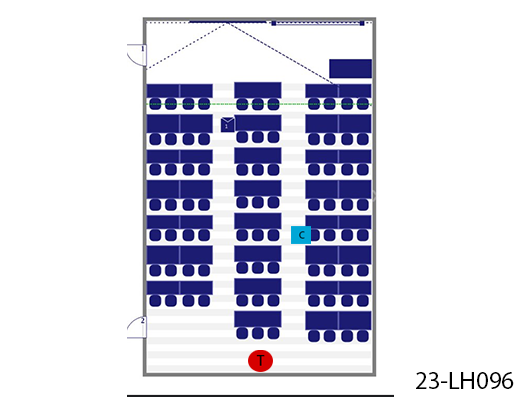 |
23 | CEG | CEG Instruction Room 0.96 | Mobile | Entrance hall CEG-C | In class | Our equipment | Our/Own laptop | Stevinweg 1
|
|
|||||||
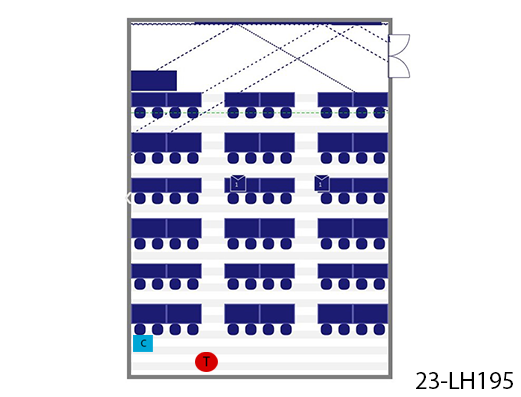 |
23 | CEG | CEG Instruction Room 1.95 | Mobile | This half floor; around CEG-1.95 | In class | Our equipment | Our/Own laptop | There is a set on half the floor. If we indicate that you must bring it yourself, follow the route below. Go to the first floor and via the MIVA elevator next to room F to the half floor, then turn right and continue until you can go no further, at the end turn right |
Stevinweg 1
|
|
||||||
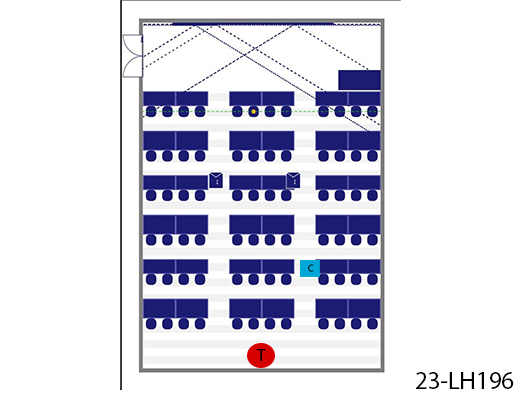 |
23 | CEG | CEG Instruction Room 1.96 | Mobile | This half floor; around CEG-1.95 | In class | Our equipment | Our/Own laptop | There is a set on half the floor. If we indicate that you must bring it yourself, follow the route below. Go to the first floor and via the MIVA elevator next to room F to the half floor, then turn right and continue until you can go no further, at the end turn right |
Stevinweg 1
|
|
||||||
 |
23 | CEG | CEG Instruction Room 1.97 | Mobile | This half floor; around CEG-1.95 | In class | Our equipment | Our/Own laptop | There is a set on half the floor. If we indicate that you must bring it yourself, follow the route below. Go to the first floor and via the MIVA elevator next to room F to the half floor, then turn right and continue until you can go no further, at the end turn right |
Stevinweg 1
|
|
||||||
 |
23 | CEG | CEG Instruction Room 1.98 | Mobile | This half floor; around CEG-1.95 | In class | Our equipment | Our/Own laptop | There is a set on half the floor. If we indicate that you must bring it yourself, follow the route below. Go to the first floor and via the MIVA elevator next to room F to the half floor, then turn right and continue until you can go no further, at the end turn right |
Stevinweg 1
|
|
||||||
 |
23 | CEG | CEG Instruction Room 2.02 | Mobile | Entrance hall CEG-C | In class | Our equipment | Our/Own laptop | Stevinweg 1
|
|
|||||||
 |
23 | CEG | CEG Instruction Room 2.98 | Mobile | Entrance hall CEG-C | In class | Our equipment | Our/Own laptop | Stevinweg 1
|
|
|||||||
 |
23 | CEG | CEG Instruction Room 2.99 | Mobile | Entrance hall CEG-C | In class | Our equipment | Our/Own laptop | Stevinweg 1
|
|
|||||||
 |
23 | CEG | CEG Instruction Room 3.02 | Mobile | Entrance hall CEG-C | In class | Our equipment | Our/Own laptop | Stevinweg 1
|
|
|||||||
 |
23 | CEG | CEG Instruction Room 3.98 | Mobile | Entrance hall CEG-C | In class | Our equipment | Our/Own laptop | Stevinweg 1
|
|
|||||||
 |
23 | CEG | CEG Instruction Room 3.99 | Mobile | Entrance hall CEG-C | In class | Our equipment | Our/Own laptop | Stevinweg 1
|
|
|||||||
 |
23 | CEG | CEG Lecture Hall A | Autotracking | Remote. Autotracking | PickUp SP | Automated | Fixed PC / Own Laptop |
Stevinweg 1
|
|
|||||||
| |
23 | CEG | CEG Lecture Hall B | Autotracking | Remote. Autotracking | PickUp SP | Automated | Fixed PC / Own Laptop |
Stevinweg 1
|
|
|||||||
 |
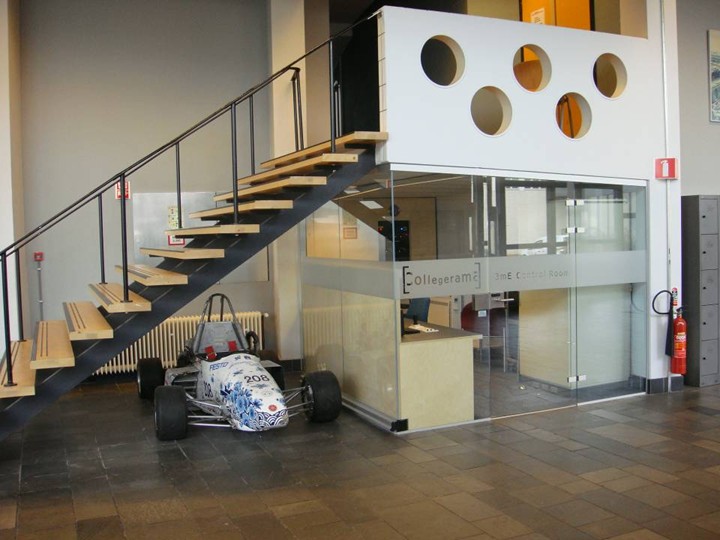
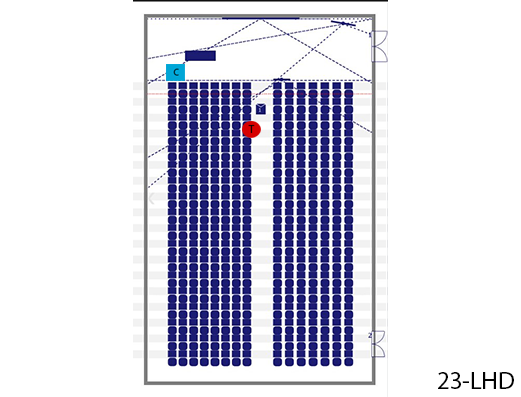
23 | CEG | CEG Lecture Hall C | Autotracking | Entrance hall CEG-C | Remote. Autotracking | Our equipment | Our/Own laptop | Stevinweg 1
|
|
|||||||
 |
23 | CEG | CEG Lecture Hall D | Autotracking | Remote. Autotracking | PickUp SP | Fixed PC / Own Laptop |
Stevinweg 1
|
|
||||||||
| |
23 | CEG | CEG Lecture Hall E | Autotracking | Remote. Autotracking | PickUp SP | Fixed PC / Own Laptop |
Stevinweg 1
|
|
||||||||
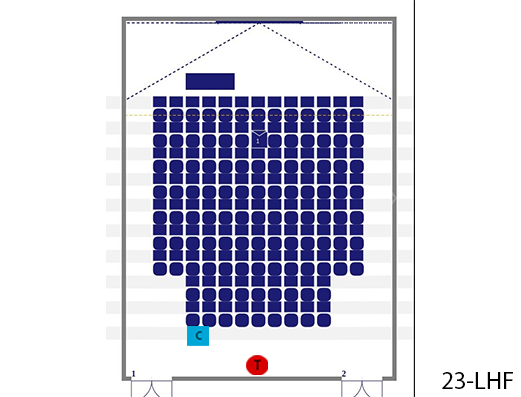 |
23 | CEG | CEG Lecture Hall F | Autotracking | Entrance hall CEG-C | Remote. Autotracking | Our equipment | Our/Own laptop | Stevinweg 1
|
|
|||||||
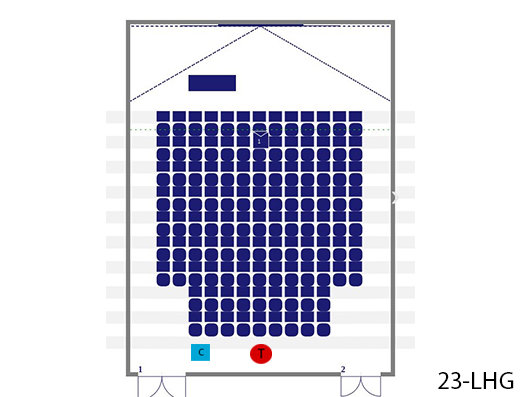 |
23 | CEG | CEG Lecture Hall G | Autotracking | Entrance hall CEG-C | Remote. Autotracking | Our equipment | Our/Own laptop | Stevinweg 1
|
|
|||||||
| 23 | CEG | CEG Project Room 1.21 | Mobile | Entrance hall CEG-C | In class | Our equipment | Our/Own laptop | Stevinweg 1
|
|
||||||||
| 23 | CEG | CEG Project Room 1.33 | Mobile | Entrance hall CEG-C | In class | Our equipment | Our/Own laptop | Stevinweg 1
|
|
||||||||
| 23 | CEG | CEG Project Room 1.93 | Mobile | Entrance hall CEG-C | In class | Our equipment | Our/Own laptop | Stevinweg 1
|
|
||||||||
 |
26 | Bouwcampus | Bouwcampus Hall 2 | Mobile | Outside room | In class | Our equipment | Our/Own laptop | Van der Burghweg 1 +2 |
|
|||||||
| 29 | ECHO | ECHO Echo Arena | Automated | No control, Automated |
PickUp SP | Fixed PC / Own Laptop |
Van Mourik Broekmanweg 5 |
|
|||||||||
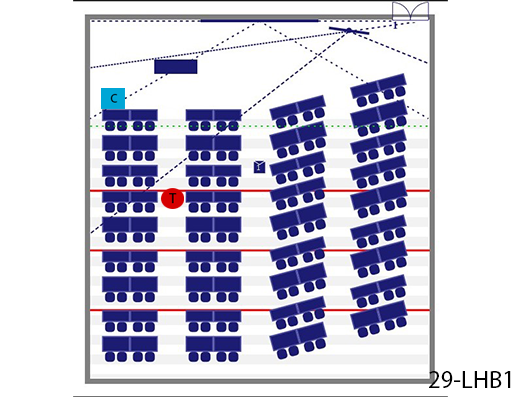 |
29 | ECHO | ECHO Hall B1 | Automated | No control, Automated |
PickUp SP | Fixed PC / Own Laptop |
Van Mourik Broekmanweg 5 |
|
||||||||
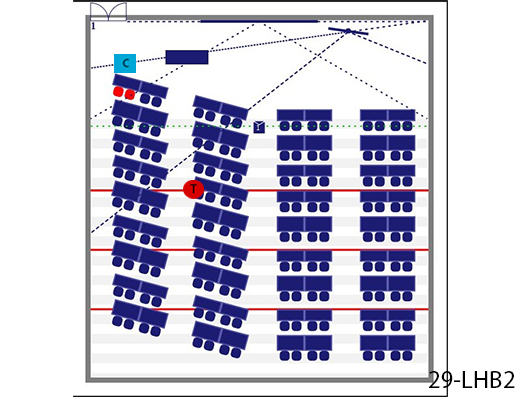 |
29 | ECHO | ECHO Hall B2 | Automated | No control, Automated |
PickUp SP | Fixed PC / Own Laptop |
Van Mourik Broekmanweg 5 |
|
||||||||
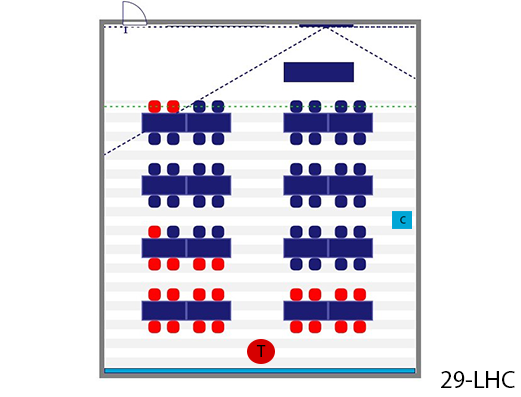 |
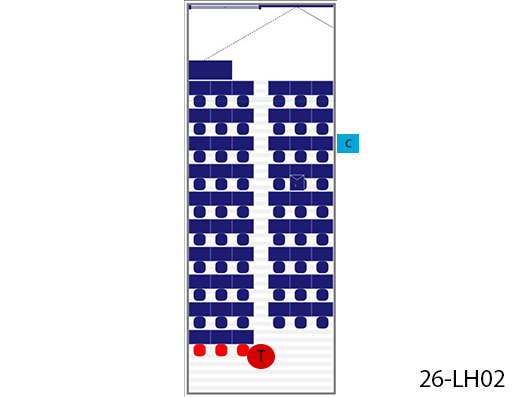
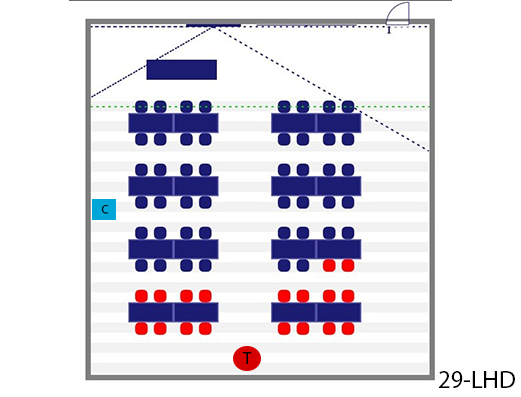
29 | ECHO | ECHO Hall C | Mobile | Outside room | In class | Our equipment | Our/Own laptop | Van Mourik Broekmanweg 5 |
|
|||||||
 |
29 | ECHO | ECHO Hall D | Mobile | Outside room | In class | Our equipment | Our/Own laptop | Van Mourik Broekmanweg 5 |
|
|||||||
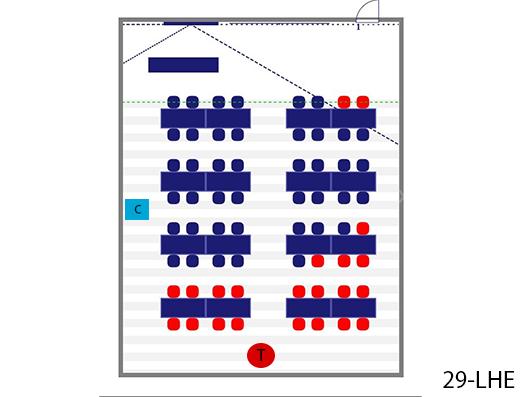 |
29 | ECHO | ECHO Hall E | Mobile | Outside room | In class | Our equipment | Our/Own laptop | Van Mourik Broekmanweg 5 |
|
|||||||
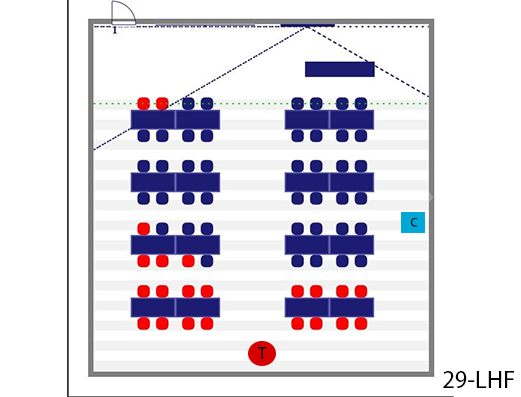 |
29 | ECHO | ECHO Hall F | Mobile | Outside room | In class | Our equipment | Our/Own laptop | Van Mourik Broekmanweg 5 |
|
|||||||
| 29 | ECHO | ECHO Lecture Hall A1 | Automated | No control, Automated |
PickUp SP | Fixed PC / Own Laptop |
Van Mourik Broekmanweg 5 |
|
|||||||||
| 29 | ECHO | ECHO Lecture Hall A2 | Automated | No control, Automated |
PickUp SP | Fixed PC / Own Laptop |
Van Mourik Broekmanweg 5 |
|
|||||||||
| 29 | ECHO | ECHO Lecture Hall A3 | Automated | No control, Automated |
PickUp SP | Fixed PC / Own Laptop |
Van Mourik Broekmanweg 5 |
|
|||||||||
| 31 | TPM | TPM Computer Room B | Mobile | Storage room next to room C; Access pass via Service Desk | In class | Our equipment | Our/Own laptop | Jaffalaan 5 |
|
||||||||
 |
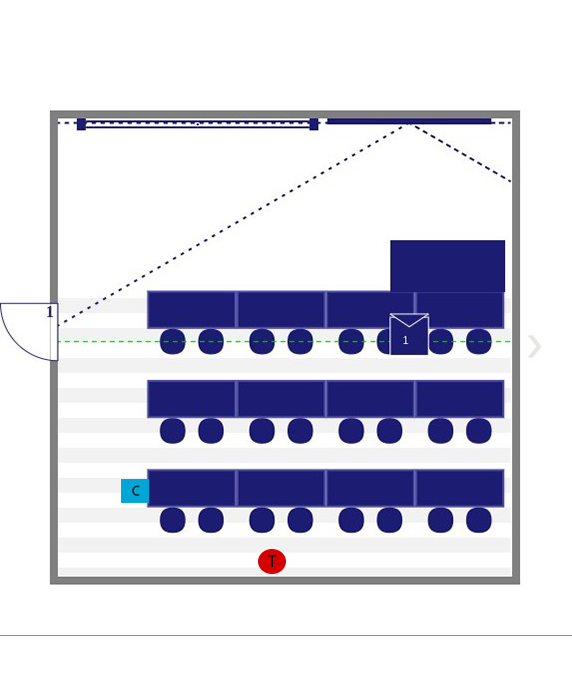
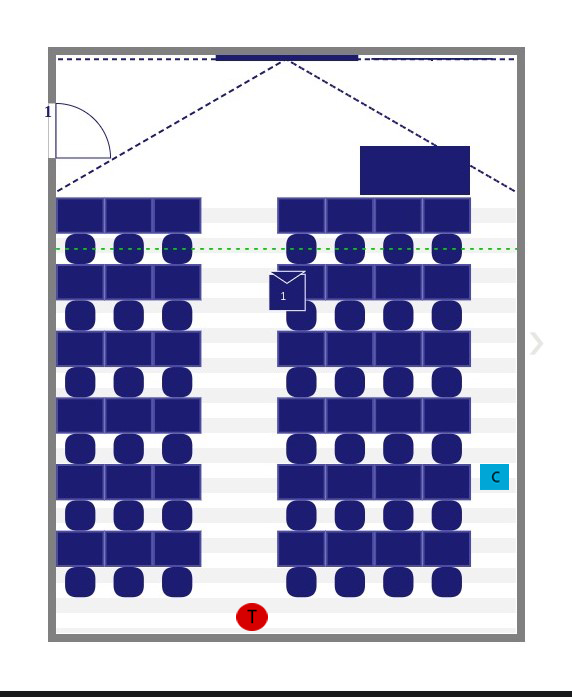
31 | TPM | TPM Hall B | Mobile | Storage room next to room C; Access pass via Service Desk | In class | Our equipment | Our/Own laptop | Jaffalaan 5 |
|
|||||||
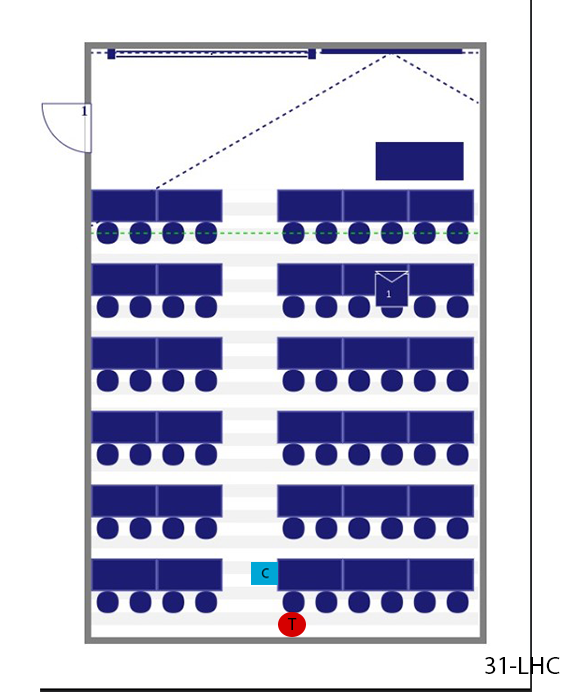 |
31 | TPM | TPM Hall C | Mobile | Storage room next to room C; Access pass via Service Desk | In class | Our equipment | Our/Own laptop | Jaffalaan 5 |
|
|||||||
| 31 | TPM | TPM Arena | Mobile | Storage room next to room C; Access pass via Service Desk | In class | Our equipment | Our/Own laptop | Jaffalaan 5 |
|
||||||||
 |
31 | TPM | TPM Hall F | Mobile | Storage room next to room C; Access pass via Service Desk | In class | Our equipment | Our/Own laptop | Jaffalaan 5 |
|
|||||||
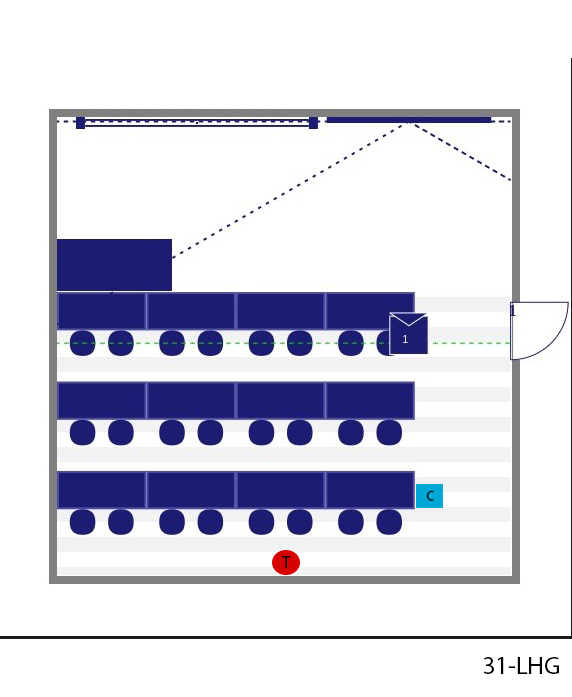 |
31 | TPM | TPM Hall G | Mobile | Storage room next to room C; Access pass via Service Desk | In class | Our equipment | Our/Own laptop | Jaffalaan 5 |
|
|||||||
 |
31 | TPM | TPM Hall H | Mobile | Storage room next to room C; Access pass via Service Desk | In class | Our equipment | Our/Own laptop | Jaffalaan 5 |
|
|||||||
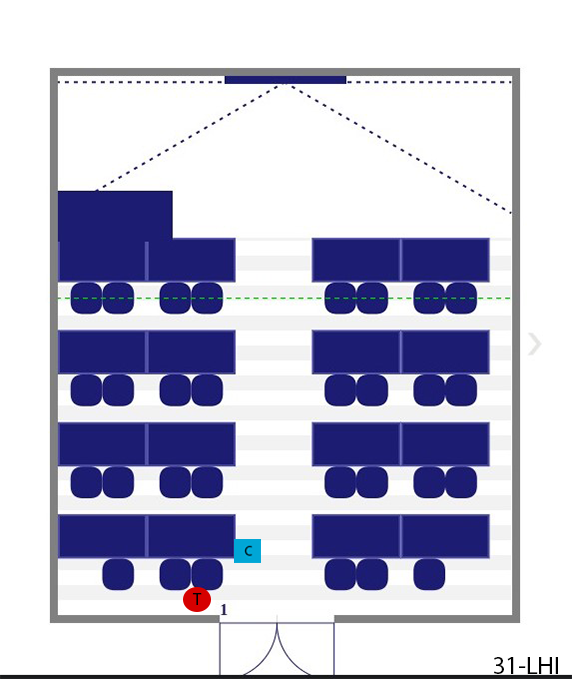 |
31 | TPM | TPM Hall I (i) | Mobile | Storage room next to room C; Access pass via Service Desk | In class | Our equipment | Our/Own laptop | Jaffalaan 5 |
|
|||||||
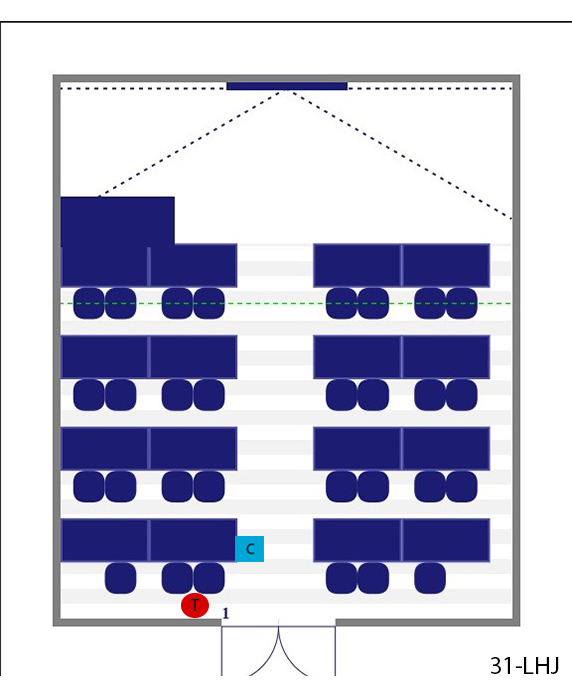 |
31 | TPM | TPM Hall J | Mobile | Storage room next to room C; Access pass via Service Desk | In class | Our equipment | Our/Own laptop | Jaffalaan 5 |
|
|||||||
 |
31 | TPM | TPM Instruction Room D1 | Mobile | Storage room next to room C; Access pass via Service Desk | In class | Our equipment | Our/Own laptop | Jaffalaan 5 |
|
|||||||
 |
31 | TPM | TPM Instruction Room D2 | Mobile | Storage room next to room C; Access pass via Service Desk | In class | Our equipment | Our/Own laptop | Jaffalaan 5 |
|
|||||||
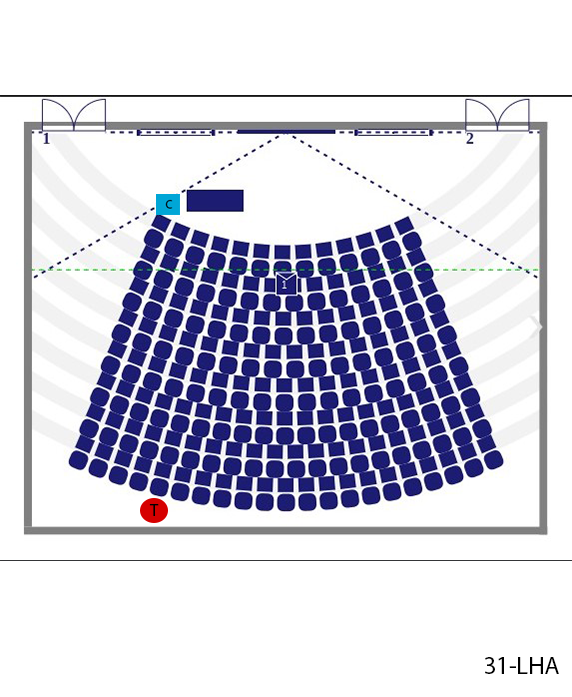 |
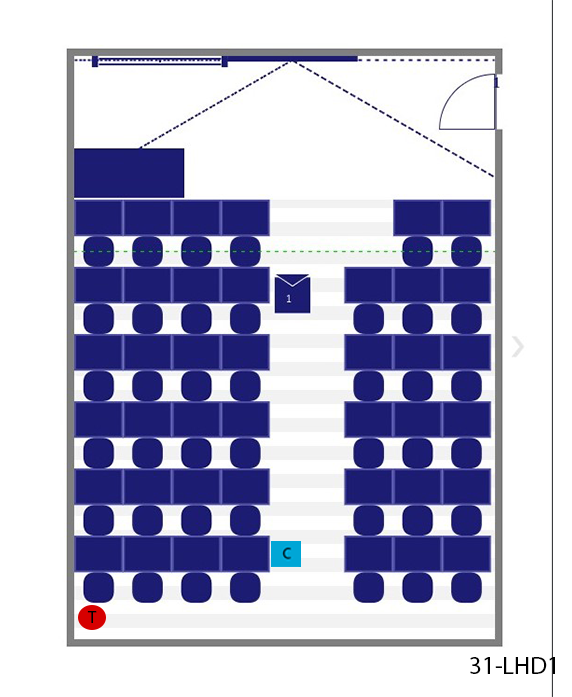
31 | TPM | TPM Lecture Hall A - Henk Sol | Mobile | Storage room next to room C; Access pass via Service Desk | In class | Our equipment | Our/Own laptop | Jaffalaan 5 |
|
|||||||
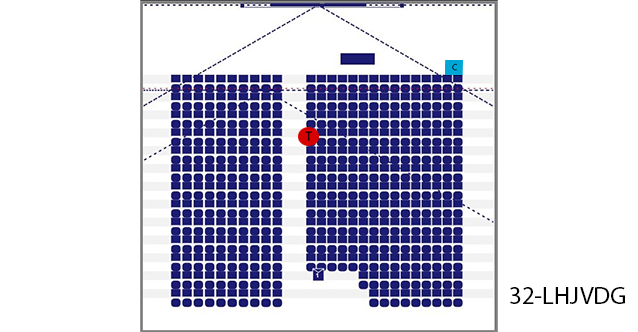
| 32 | IDE | IDE Computer Room Ctrl | Mobile | Outside room | In class | Our equipment | Our/Own laptop | Landbergstraat 15 |
|
||||||||
| 32 | IDE | IDE Computer Room Enter | Mobile | Outside room | In class | Our equipment | Our/Own laptop | Landbergstraat 15 |
|
||||||||
| 32 | IDE | IDE Computer Room Shift | Mobile | Outside room | In class | Our equipment | Our/Own laptop | Landbergstraat 15 |
|
||||||||
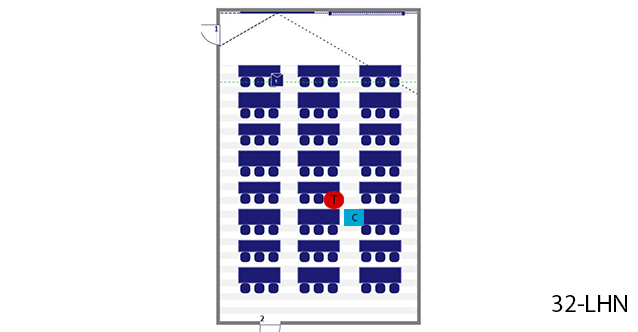 |
32 | IDE | IDE Hall N - Bernd Schierbeek | Mobile | Outside room | In class | Our equipment | Our/Own laptop | Landbergstraat 15 |
|
|||||||
 |
32 | IDE | IDE Hall O - Hans Dirken | Mobile | Outside room | In class | Our equipment | Our/Own laptop | Landbergstraat 15 |
|
|||||||
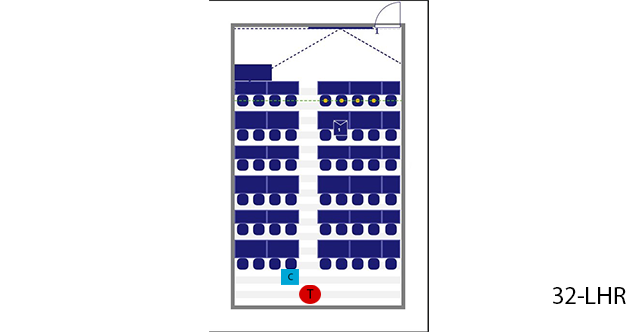 |
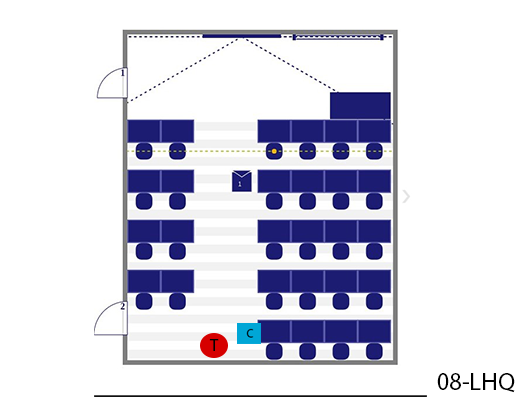
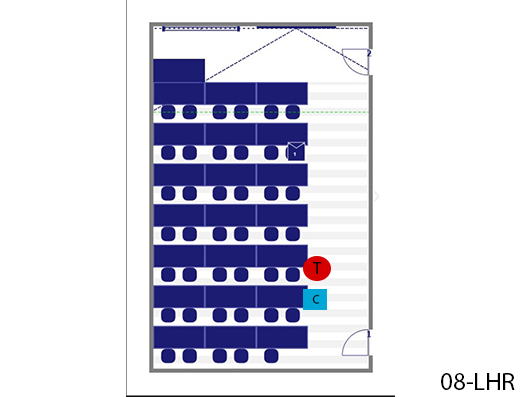
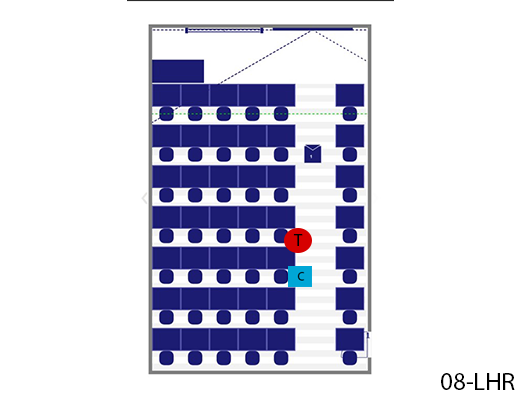
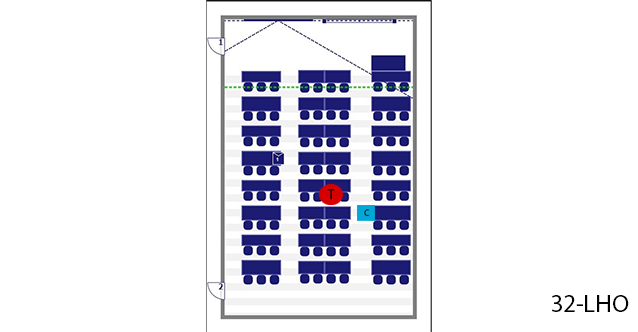
32 | IDE | IDE Hall R - Emile Truijen | Mobile | Outside room | In class | Our equipment | Our/Own laptop | Landbergstraat 15 |
|
|||||||
|
32 | IDE | IDE Hall T - Joost van der Grinten | Autotracking | Remote. Autotracking | PickUp SP | Fixed PC / Own Laptop |
Landbergstraat 15 |
|
||||||||
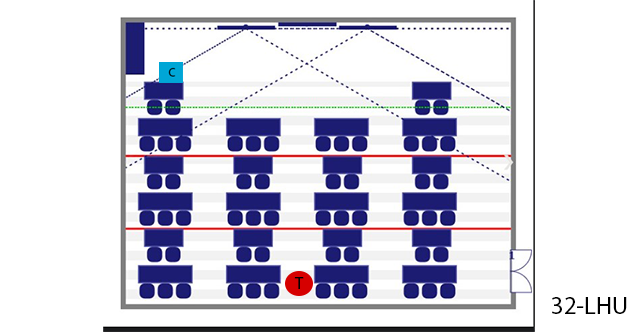 |
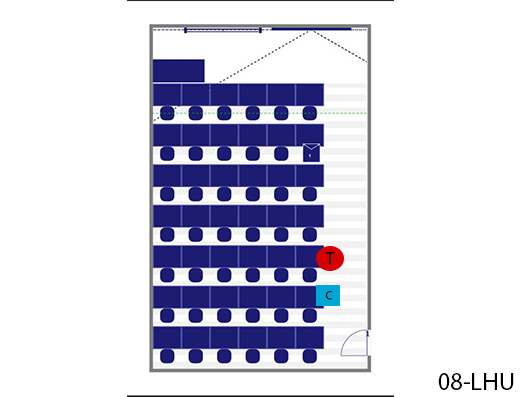
32 | IDE | IDE Hall U - Wim Crouwel | Mobile | Outside room | In class | Our equipment | Our/Own laptop | Landbergstraat 15 |
|
|||||||
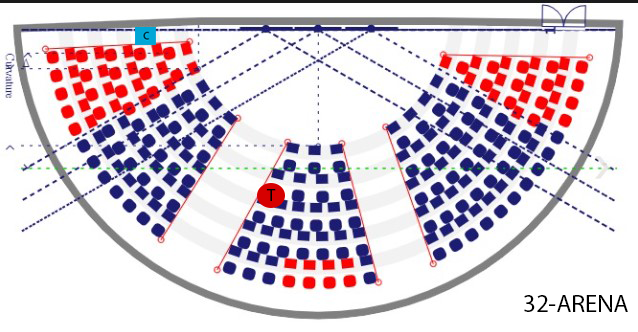 |
32 | IDE | IDE ODE Arena | Mobile | Outside room | In class | Our equipment | Our/Own laptop | Landbergstraat 15 |
|
|||||||
| 33 | Pulse | Pulse Breakout | Mobile | In class | Our equipment | Our/Own laptop | Landbergstraat 19 |
|
|||||||||
| 33 | Pulse | Pulse Hall 1 | Automated | No control, Automated |
PickUp SP | Fixed PC / Own Laptop |
Landbergstraat 19 |
|
|||||||||
| 33 | Pulse | Pulse Hall 10 | Automated | No control, Automated |
PickUp SP | Fixed PC / Own Laptop |
Landbergstraat 19 |
|
|||||||||
| 33 | Pulse | Pulse Hall 2 | Automated | No control, Automated |
PickUp SP | Fixed PC / Own Laptop |
Landbergstraat 19 |
|
|||||||||
| 33 | Pulse | Pulse Hall 3 | Automated | No control, Automated |
PickUp SP | Fixed PC / Own Laptop |
Landbergstraat 19 |
|
|||||||||
| 33 | Pulse | Pulse Hall 4 | Automated | No control, Automated |
PickUp SP | Fixed PC / Own Laptop |
Landbergstraat 19 |
|
|||||||||
| 33 | Pulse | Pulse Hall 5 | Automated | No control, Automated |
PickUp SP | Fixed PC / Own Laptop |
Landbergstraat 19 |
|
|||||||||
| 33 | Pulse | Pulse Hall 6 | Automated | No control, Automated |
PickUp SP | Fixed PC / Own Laptop |
Landbergstraat 19 |
|
|||||||||
| 33 | Pulse | Pulse Hall 7 | Automated | No control, Automated |
PickUp SP | Fixed PC / Own Laptop |
Landbergstraat 19 |
|
|||||||||
| 33 | Pulse | Pulse Hall 8 | Automated | No control, Automated |
PickUp SP | Fixed PC / Own Laptop |
Landbergstraat 19 |
|
|||||||||
| 33 | Pulse | Pulse Hall 9 | Automated | No control, Automated |
PickUp SP | Fixed PC / Own Laptop |
Landbergstraat 19 |
|
|||||||||
| 33 | Pulse | Pulse Square | Mobile | In class | Our equipment | Our/Own laptop | Landbergstraat 19 |
|
|||||||||
| 33 | Pulse | Pulse Technology | Automated | No control, Automated |
PickUp SP | Fixed PC / Own Laptop |
Landbergstraat 19 |
|
|||||||||
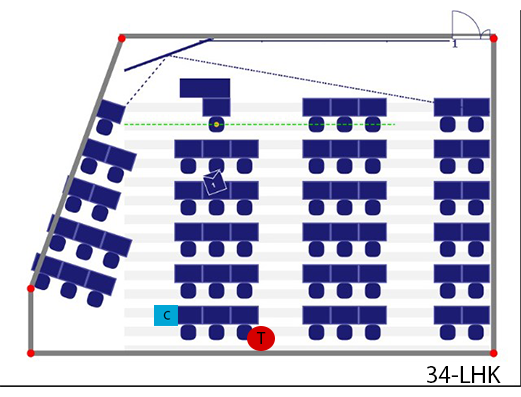
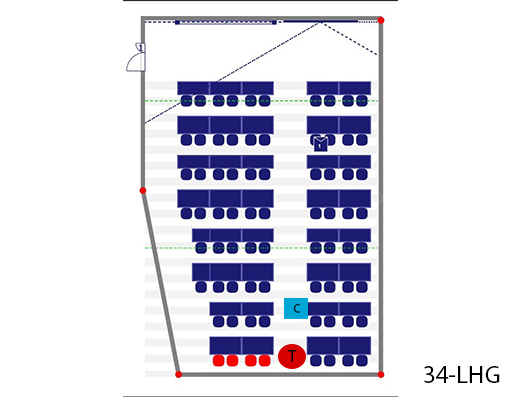 |
34 | ME | ME Hall G | Mobile | Outside room | In class | Our equipment | Our/Own laptop | Mekelweg 2
|
|
|||||||
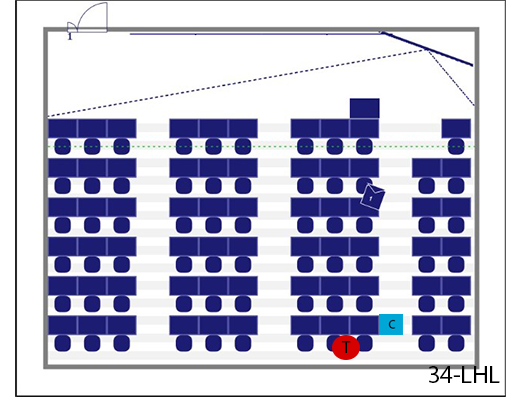
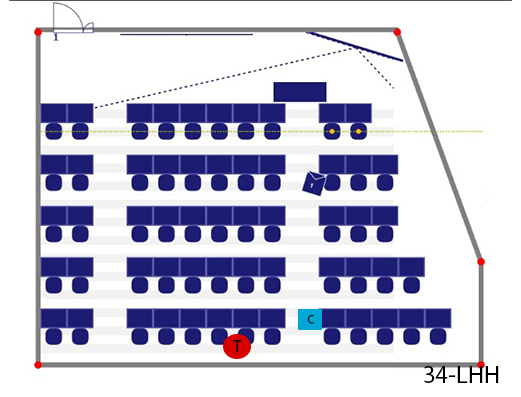 |
34 | ME | ME Hall H | Mobile | Outside room | In class | Our equipment | Our/Own laptop | Mekelweg 2
|
|
|||||||
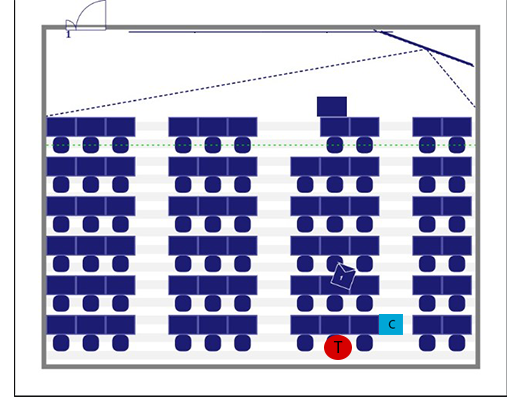 |
34 | ME | ME Hall I (i) | Mobile | Outside room | In class | Our equipment | Our/Own laptop | Mekelweg 2
|
|
|||||||
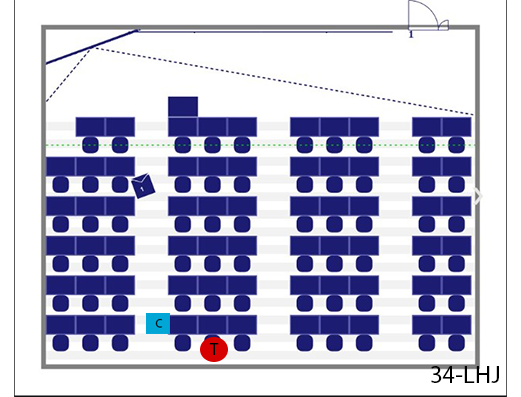 |
34 | ME | ME Hall J | Mobile | Outside room | In class | Our equipment | Our/Own laptop | Mekelweg 2
|
|
|||||||
 |
34 | ME | ME Hall K | Mobile | Outside room | In class | Our equipment | Our/Own laptop | Mekelweg 2
|
|
|||||||
 |
34 | ME | ME Hall L | Mobile | Outside room | In class | Our equipment | Our/Own laptop | Mekelweg 2
|
|
|||||||
 |
34 | ME | ME Hall M | Mobile | Outside room | In class | Our equipment | Our/Own laptop | Mekelweg 2
|
|
|||||||
| |
34 | ME | ME Lecture Hall A - Leonardo da Vinci | Automated | No control, Automated |
PickUp SP | Fixed PC / Own Laptop |
Mekelweg 2
|
|
||||||||
| |
34 | ME | ME Lecture Hall B - Isaac Newton | Automated | No control, Automated |
PickUp SP | Fixed PC / Own Laptop |
Mekelweg 2
|
|
||||||||
| |
34 | ME | ME Lecture Hall C - Daniel Bernoulli | ControlRoom | Remote operator | PickUp SP | Fixed PC / Own Laptop |
Mekelweg 2
|
|
||||||||
| |
34 | ME | ME Lecture Hall D - James Watt | ControlRoom | Remote operator | PickUp SP | Automated | Fixed PC / Own Laptop |
Mekelweg 2
|
|
|||||||
| |
34 | ME | ME Lecture Hall E - Robert Hooke | Automated | No control, Automated |
PickUp SP | Fixed PC / Own Laptop |
Mekelweg 2
|
|
||||||||
| 34 | ME | ME Lecture Hall F - Simon Stevin | Unsuitable | Unsuitable | Mekelweg 2
|
|
|||||||||||
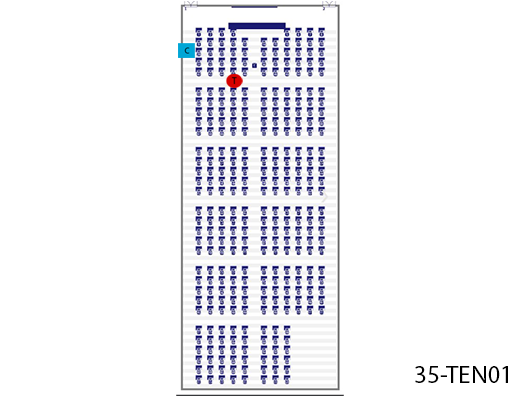 |
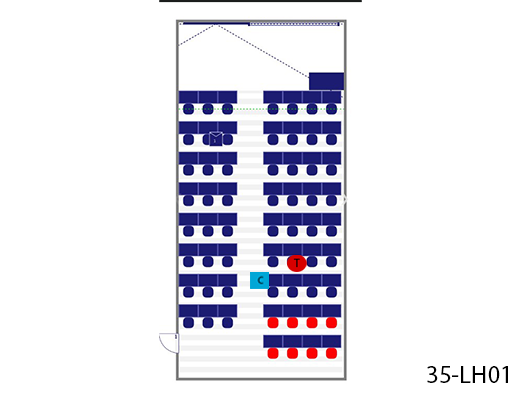
35 | Drebbelweg | Drebbelweg Hall 1 | Mobile | Outside room | In class | Our equipment | Our/Own laptop | Cornelis Drebbelweg 5 |
|
|||||||
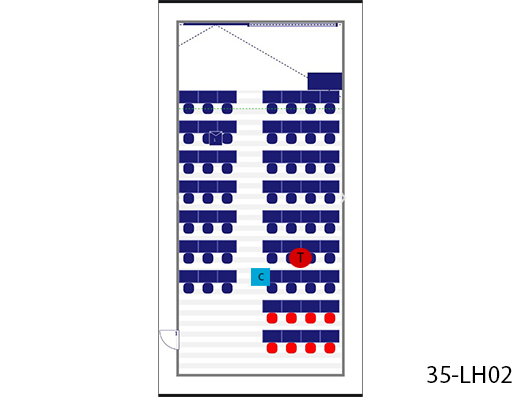
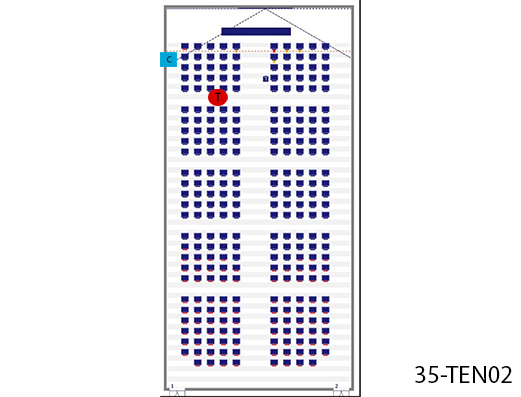 |
35 | Drebbelweg | Drebbelweg Hall 2 | Mobile | Outside room | In class | Our equipment | Our/Own laptop | Cornelis Drebbelweg 5 |
|
|||||||
 |
35 | Drebbelweg | Drebbelweg Instruction Room 1 | Mobile | Outside room | In class | Our equipment | Our/Own laptop | Cornelis Drebbelweg 5 |
|
|||||||
 |
35 | Drebbelweg | Drebbelweg Instruction Room 2 | Mobile | Outside room | In class | Our equipment | Our/Own laptop | Cornelis Drebbelweg 5 |
|
|||||||
 |
35 | Drebbelweg | Drebbelweg Instruction Room 3 | Mobile | Outside room | In class | Our equipment | Our/Own laptop | Cornelis Drebbelweg 5 |
|
|||||||
 |
35 | Drebbelweg | Drebbelweg Instruction Room 4 | Mobile | Outside room | In class | Our equipment | Our/Own laptop | Cornelis Drebbelweg 5 |
|
|||||||
| 35 | Drebbelweg | Drebbelweg PC Hall 1 | Unsuitable | Outside room | Unsuitable | Cornelis Drebbelweg 5 |
|
||||||||||
| 35 | Drebbelweg | Drebbelweg PC Hall 2 | Mobile | Outside room | In class | Our equipment | Our/Own laptop | Cornelis Drebbelweg 5 |
|
||||||||
| 35 | Drebbelweg | Drebbelweg PC Hall 3 | Mobile | Outside room | In class | Our equipment | Our/Own laptop | Cornelis Drebbelweg 5 |
|
||||||||
| 35 | Drebbelweg | Drebbelweg PC Hall 4 | Mobile | Outside room | In class | Our equipment | Our/Own laptop | Cornelis Drebbelweg 5 |
|
||||||||
| 35 | Drebbelweg | Drebbelweg Project Room 1 | Mobile | Outside room | In class | Our equipment | Our/Own laptop | Cornelis Drebbelweg 5 |
|
||||||||
| 35 | Drebbelweg | Drebbelweg Project Room 2 | Unsuitable | Outside room | Unsuitable | Cornelis Drebbelweg 5 |
|
||||||||||
| 35 | Drebbelweg | Drebbelweg Project Room 3 | Unsuitable | Outside room | Unsuitable | Cornelis Drebbelweg 5 |
|
||||||||||
| 35 | Drebbelweg | Drebbelweg Project Room 4 | Unsuitable | Outside room | Unsuitable | Cornelis Drebbelweg 5 |
|
||||||||||
| 35 | Drebbelweg | Drebbelweg Project Room 5 | Unsuitable | Outside room | Unsuitable | Cornelis Drebbelweg 5 |
|
||||||||||
| 35 | Drebbelweg | Drebbelweg Project Room 6 | Unsuitable | Outside room | Unsuitable | Cornelis Drebbelweg 5 |
|
||||||||||
| 35 | Drebbelweg | Drebbelweg Project Room 7 | Unsuitable | Outside room | Unsuitable | Cornelis Drebbelweg 5 |
|
||||||||||
| 35 | Drebbelweg | Drebbelweg Project Room 8 | Unsuitable | Outside room | Unsuitable | Cornelis Drebbelweg 5 |
|
||||||||||
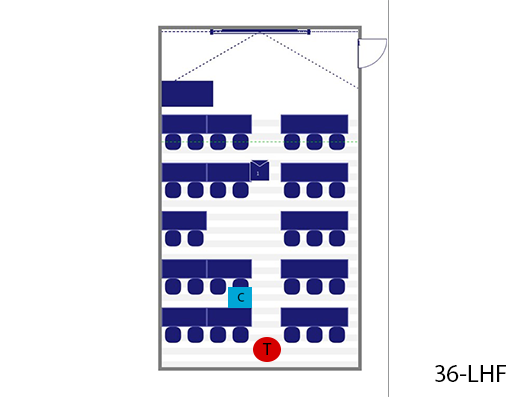 |
36 | EEMCS | EEMCS Hall F | Mobile | Outside room | In class | Our equipment | Our/Own laptop | Mekelweg 4
|
|
|||||||
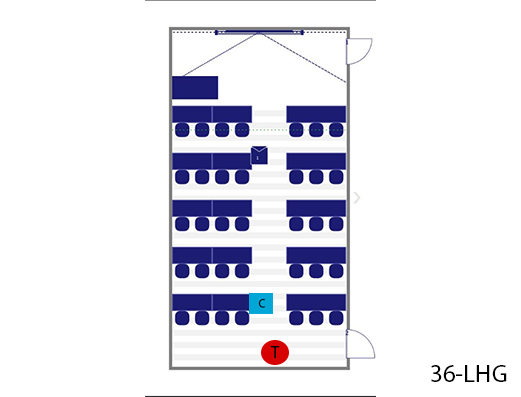 |
36 | EEMCS | EEMCS Hall G | Mobile | Outside room | In class | Our equipment | Our/Own laptop | Mekelweg 4
|
|
|||||||
| 36 | EEMCS | EEMCS Hall H | Unsuitable | Outside room | Unsuitable | Mekelweg 4
|
|
||||||||||
| 36 | EEMCS | EEMCS Hall J | Unsuitable | Unsuitable | Mekelweg 4
|
|
|||||||||||
| 36 | EEMCS | EEMCS Hall K | Unsuitable | Unsuitable | Mekelweg 4
|
|
|||||||||||
| 36 | EEMCS | EEMCS Hall L | Unsuitable | Unsuitable | Mekelweg 4
|
|
|||||||||||
| 36 | EEMCS | EEMCS Hall M | Unsuitable | Unsuitable | Mekelweg 4
|
|
|||||||||||
| |
36 | EEMCS | EEMCS Lecture Hall Ampere | Automated | No control, Automated |
PickUp SP | Fixed PC / Own Laptop |
Mekelweg 4
|
|
||||||||
| |
36 | EEMCS | EEMCS Lecture Hall Boole | Automated | No control, Automated |
PickUp SP | Fixed PC / Own Laptop |
Mekelweg 4
|
|
||||||||
| |
36 | EEMCS | EEMCS Lecture Hall Chip | ControlRoom | Remote operator | PickUp SP | Fixed PC / Own Laptop |
Mekelweg 4
|
|
||||||||
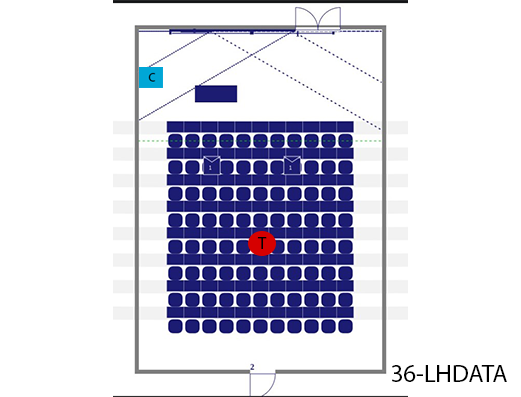 |
36 | EEMCS | EEMCS Lecture Hall D@ta | Mobile | Outside room | In class | Our equipment | Our/Own laptop | Mekelweg 4
|
|
|||||||
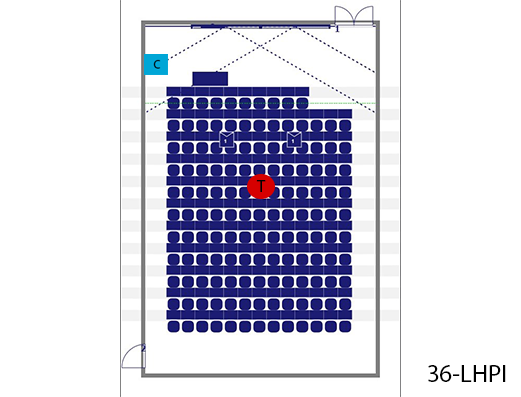 |
36 | EEMCS | EEMCS Lecture Hall π (Pi) | Mobile | Outside room | In class | Our equipment | Our/Own laptop | Mekelweg 4
|
|
|||||||
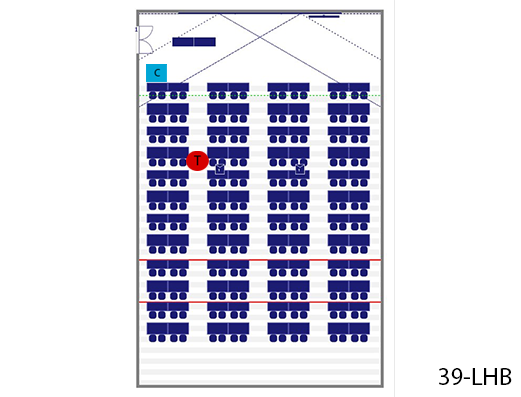
| |
39 | Flux | Flux Hall A | Automated | No control, Automated |
PickUp SP Drebbelweg B35 | Fixed PC / Own Laptop |
Cornelis Drebbelweg 6 |
|
||||||||
 |
39 | Flux | Flux Hall B | Automated | No control, Automated |
PickUp SP Drebbelweg B35 | Fixed PC / Own Laptop |
Cornelis Drebbelweg 6 |
|
||||||||
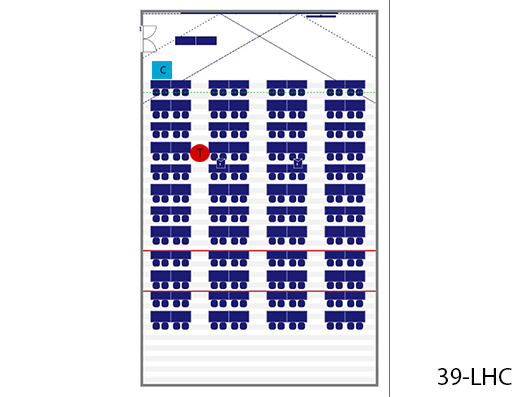 |
39 | Flux | Flux Hall C | Automated | No control, Automated |
PickUp SP Drebbelweg B35 | Fixed PC / Own Laptop |
Cornelis Drebbelweg 6 |
|
||||||||
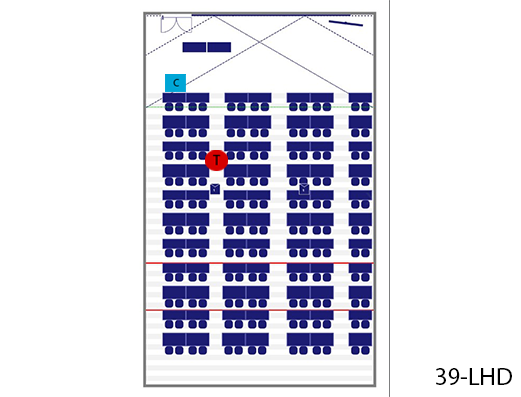 |
39 | Flux | Flux Hall D | Automated | No control, Automated |
PickUp SP Drebbelweg B35 | Fixed PC / Own Laptop |
Cornelis Drebbelweg 6 |
|
||||||||
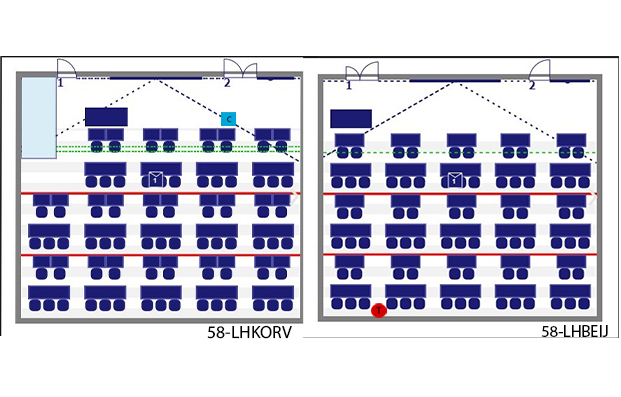 |
58 | AS | AS (58) Korvezee + Beijerinck Hall | Mobile | Location, B58-D0.040 |
Our/Own laptop | Van der Maasweg 9 |
|
|||||||||
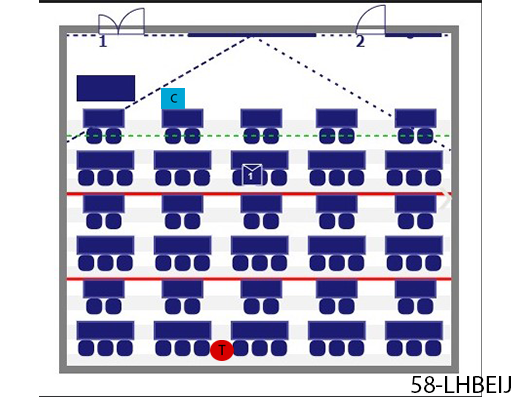 |
58 | AS | AS (58) Beijerinck Hall | Mobile | Location, B58-D0.040 |
In class | Our equipment | Our/Own laptop | Van der Maasweg 9 |
|
|||||||
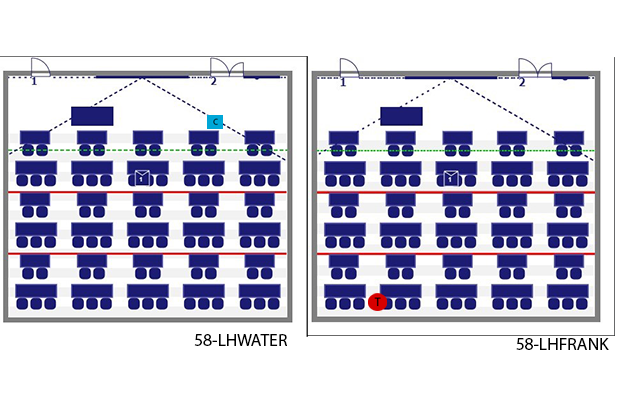 |
58 | AS | AS (58) Franklin + Waterman Hall | Mobile | Location, B58-D0.040 |
Our equipment | Our/Own laptop | Van der Maasweg 9 |
|
||||||||
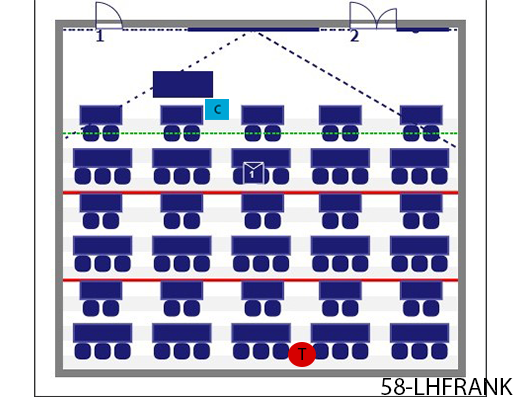 |
58 | AS | AS (58) Franklin Hall | Mobile | Location, B58-D0.040 |
In class | Our equipment | Our/Own laptop | Van der Maasweg 9 |
|
|||||||
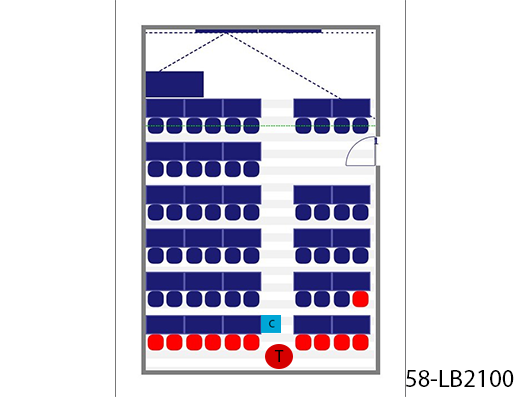 |
58 | AS | AS (58) Instruction Room B2.100 | Mobile | Location, B58-D0.040 |
In class | Our equipment | Our/Own laptop | Van der Maasweg 9 |
|
|||||||
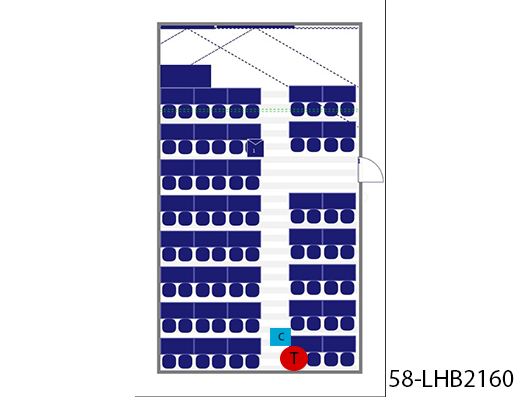 |
58 | AS | AS (58) Instruction Room B2.160 | Mobile | Location, B58-D0.040 |
In class | Our equipment | Our/Own laptop | Van der Maasweg 9 |
|
|||||||
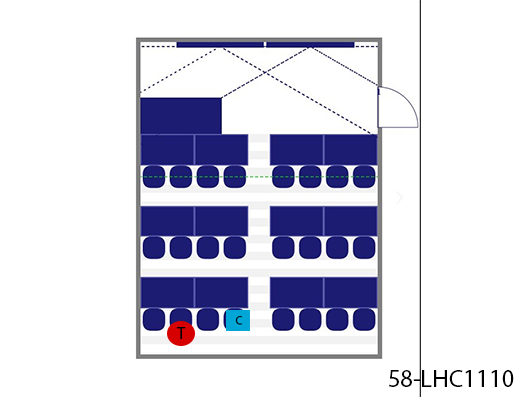 |
58 | AS | AS (58) Instruction Room C1.110 | Mobile | Location, B58-D0.040 |
In class | Our equipment | Our/Own laptop | Van der Maasweg 9 |
|
|||||||
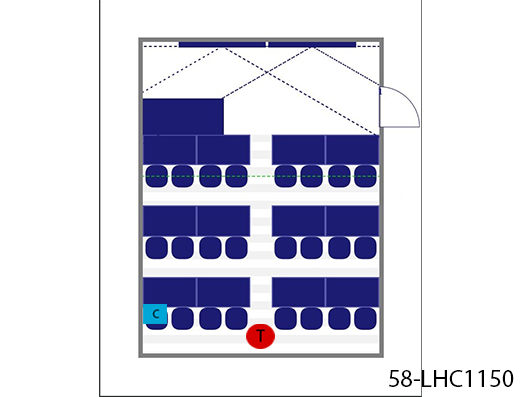 |
58 | AS | AS (58) Instruction Room C1.150 | Mobile | Location, B58-D0.040 |
In class | Our equipment | Our/Own laptop | Van der Maasweg 9 |
|
|||||||
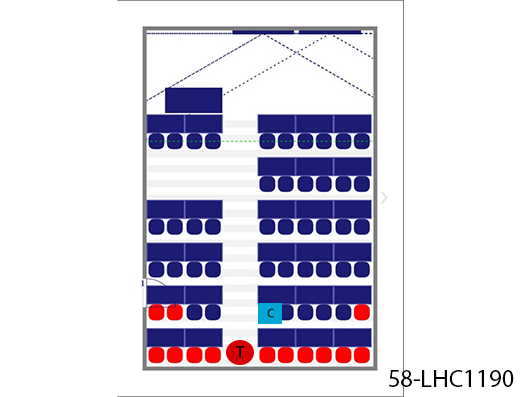 |
58 | AS | AS (58) Instruction Room C1.190 | Mobile | Location, B58-D0.040 |
In class | Our equipment | Our/Own laptop | Van der Maasweg 9 |
|
|||||||
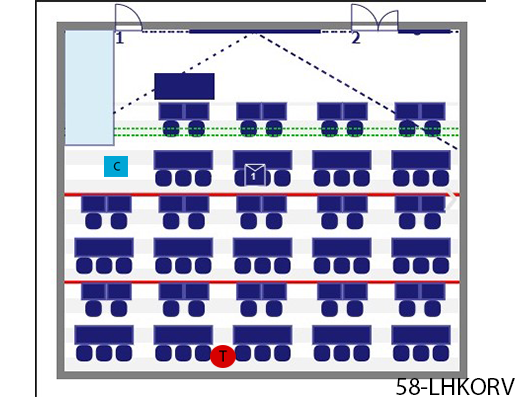 |
58 | AS | AS (58) Korvezee Hall | Mobile | Location, B58-D0.040 |
In class | Our equipment | Our/Own laptop | Van der Maasweg 9 |
|
|||||||
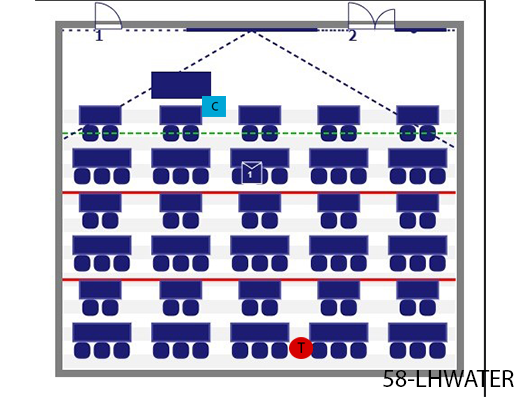 |
58 | AS | AS (58) Waterman Hall | Mobile | Location, B58-D0.040 |
In class | Our equipment | Our/Own laptop | Van der Maasweg 9 |
|
|||||||
| 62 | AE | AE Computer Room 007 | Mobile | Outside room | In class | Our equipment | Our/Own laptop | Kluyverweg 1 |
|
||||||||
 |
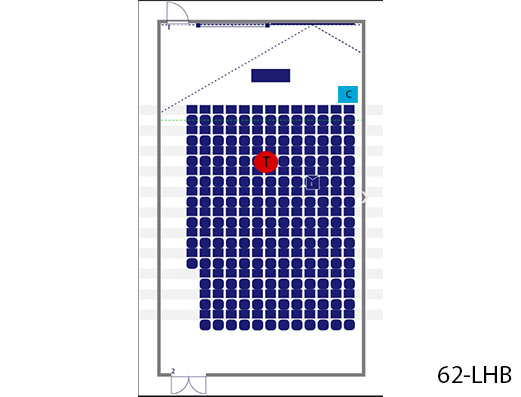
62 | AE | AE Hall L (formerly E) | Mobile | Outside room | In class | Our equipment | Our/Own laptop | Kluyverweg 1 |
|
|||||||
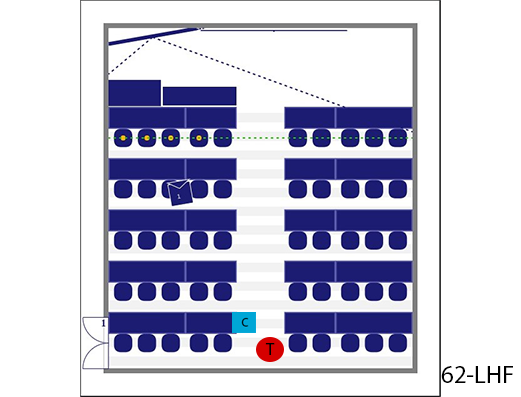 |
62 | AE | AE Hall H (formerly F) | Mobile | Outside room | In class | Our equipment | Our/Own laptop | Kluyverweg 1 |
|
|||||||
 |
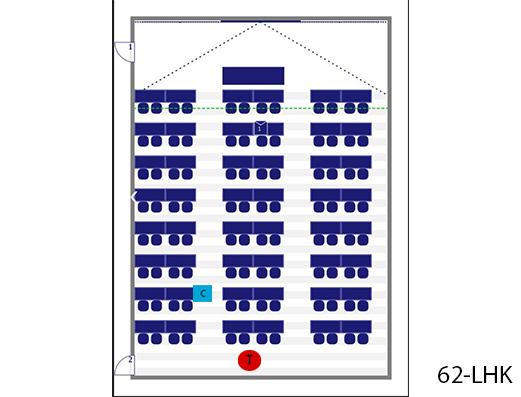
62 | AE | AE Hall K (formerly G) | Mobile | Outside room | In class | Our equipment | Our/Own laptop | Kluyverweg 1 |
|
|||||||
 |
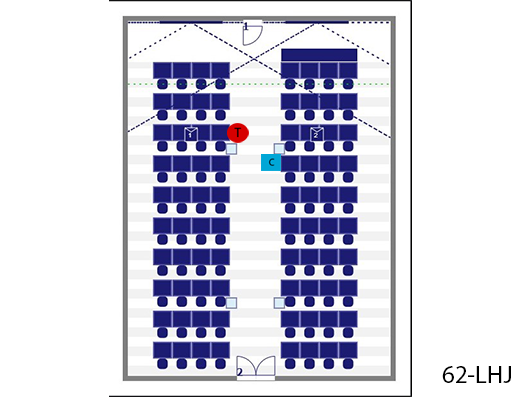
62 | AE | AE Hall J (formerly H) | Mobile | Outside room | In class | Our equipment | Our/Own laptop | Kluyverweg 1 |
|
|||||||
 |
62 | AE | AE Hall N (formerly J) | Unsuitable | Unsuitable | Kluyverweg 1 |
|
||||||||||
 |
62 | AE | AE Hall E (formerly K) | Mobile | Outside room | In class | Our equipment | Our/Own laptop | Kluyverweg 1 |
|
|||||||
 |
62 | AE | AE Lecture Hall A | Automated | No control, Automated |
PickUp SP | Fixed PC / Own Laptop |
Kluyverweg 1 |
|
||||||||
 |
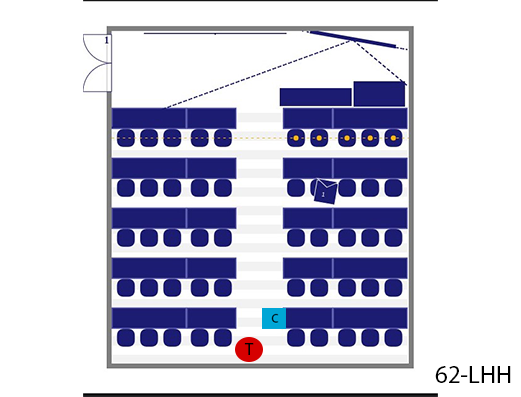
62 | AE | AE Lecture Hall G (formerly B) | Mobile | Outside room | In class | Our equipment | Our/Own laptop | Kluyverweg 1 |
|
|||||||
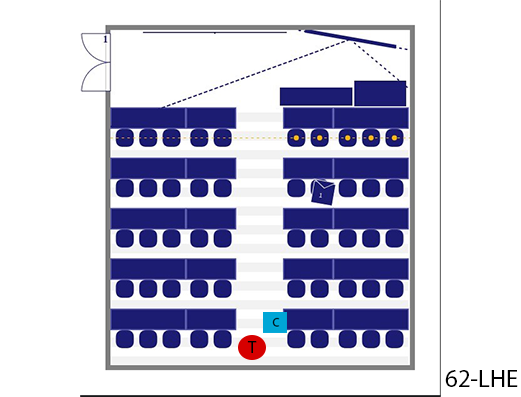
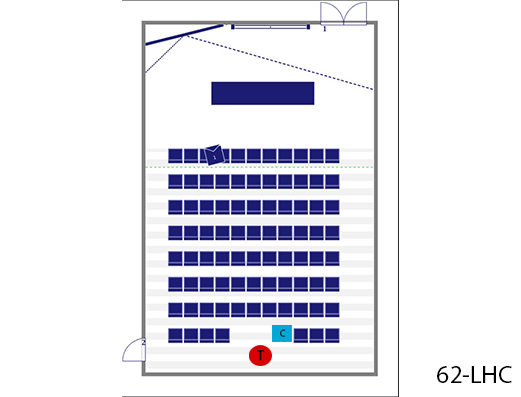 |
62 | AE | AE Lecture Hall C | Mobile | Outside room | In class | Our equipment | Our/Own laptop | Kluyverweg 1 |
|
|||||||
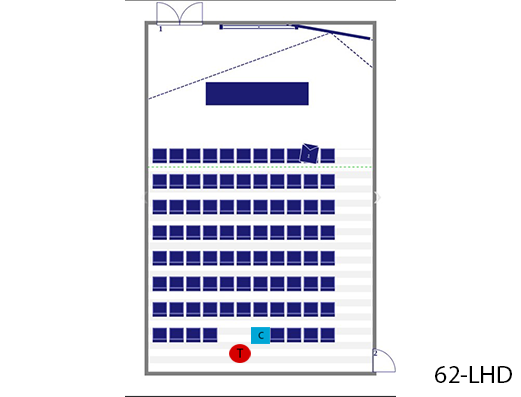 |
62 | AE | AE Lecture Hall B (formerly D) | Mobile | Outside room | In class | Our equipment | Our/Own laptop | Kluyverweg 1 |
|
|||||||
| 66 | Fellowship | Fellowship Instruction Room 1 | Mobile | Outside room | In class | Our equipment | Our/Own laptop | Kluyverweg 5 |
|
||||||||
| 66 | Fellowship | Fellowship Instruction Room 2 | Mobile | Outside room | In class | Our equipment | Our/Own laptop | Kluyverweg 5 |
|
||||||||
| 66 | Fellowship | Fellowship Instruction Room 3 | Mobile | Outside room | In class | Our equipment | Our/Own laptop | Kluyverweg 5 |
|
||||||||
| 66 | Fellowship | Fellowship Instruction Room 4 | Mobile | Outside room | In class | Our equipment | Our/Own laptop | Kluyverweg 5 |
|
||||||||
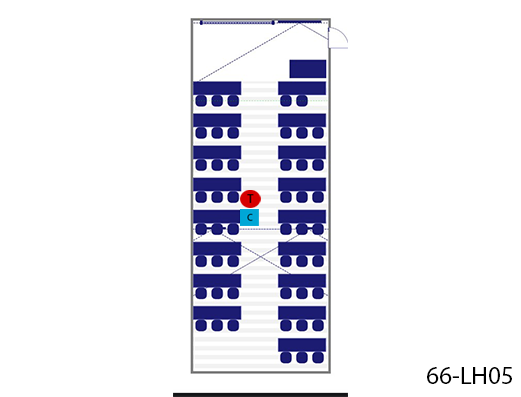 |
66 | Fellowship | Fellowship Instruction Room 5 | Mobile | Outside room | In class | Our equipment | Our/Own laptop | Kluyverweg 5 |
|
|||||||
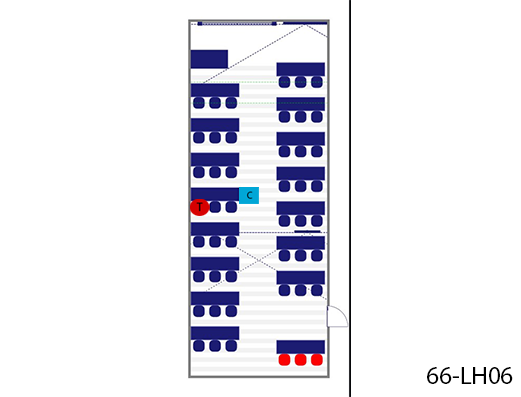 |
66 | Fellowship | Fellowship Instruction Room 6 | Mobile | Outside room | In class | Our equipment | Our/Own laptop | Kluyverweg 5 |
|
|||||||
 |
66 | Fellowship | Fellowship Instruction Room 7 | Mobile | Outside room | In class | Our equipment | Our/Own laptop | Kluyverweg 5 |
|
|||||||
 |
66 | Fellowship | Fellowship Instruction Room 8 | Mobile | Outside room | In class | Our equipment | Our/Own laptop | Kluyverweg 5 |
|
|||||||
| 66 | Fellowship | Fellowship Project Room 1 | Mobile | Outside room | In class | Our equipment | Our/Own laptop | Kluyverweg 5 |
|
||||||||
| 66 | Fellowship | Fellowship Project Room 10 | Mobile | Outside room | In class | Our equipment | Our/Own laptop | Kluyverweg 5 |
|
||||||||
| 66 | Fellowship | Fellowship Project Room 2 | Mobile | Outside room | In class | Our equipment | Our/Own laptop | Kluyverweg 5 |
|
||||||||
| 66 | Fellowship | Fellowship Project Room 3 | Mobile | Outside room | In class | Our equipment | Our/Own laptop | Kluyverweg 5 |
|
||||||||
| 66 | Fellowship | Fellowship Project Room 4 | Mobile | Outside room | In class | Our equipment | Our/Own laptop | Kluyverweg 5 |
|
||||||||
| 66 | Fellowship | Fellowship Project Room 5 | Mobile | Outside room | In class | Our equipment | Our/Own laptop | Kluyverweg 5 |
|
||||||||
| 66 | Fellowship | Fellowship Project Room 6 | Mobile | Outside room | In class | Our equipment | Our/Own laptop | Kluyverweg 5 |
|
||||||||
| 66 | Fellowship | Fellowship Project Room 7 | Mobile | Outside room | In class | Our equipment | Our/Own laptop | Kluyverweg 5 |
|
||||||||
| 66 | Fellowship | Fellowship Project Room 8 | Mobile | Outside room | In class | Our equipment | Our/Own laptop | Kluyverweg 5 |
|
||||||||
| 66 | Fellowship | Fellowship Project Room 9 | Mobile | Outside room | In class | Our equipment | Our/Own laptop | Kluyverweg 5 |
|
||||||||
| 66 | Fellowship | Fellowship Studio Classroom 1 | Mobile | Outside room | In class | Our equipment | Our/Own laptop | Kluyverweg 5 |
|
||||||||
| 66 | Fellowship | Fellowship Studio Classroom 2 | Mobile | Outside room | In class | Our equipment | Our/Own laptop | Kluyverweg 5 |
|
||||||||
| 221 | DUWO | DUWO Lecture Hall | Mobile | Outside room | In class | Our equipment | Our/Own laptop | Professor Schermerhornstraat 4 |
|
||||||||
| 0 | Pathe | Pathe Hall 1 | Unsuitable | Unsuitable | Vesteplein 5 |
|
|||||||||||
| 0 | Pathe | Pathe Hall 3 | Unsuitable | Unsuitable | Vesteplein 5 |
|
|||||||||||
| 0 | Pathe | Pathe Hall 6 | Unsuitable | Unsuitable | Vesteplein 5 |
|